
|
53.993 bytes |
Service Hints & Tips |
Document ID: MNOK-3ZXN7S |
Aptiva - 2138 Installing the Processor Heat Sink and Fan
Applicable to: World-Wide
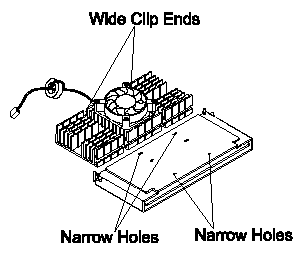
The Pentium II processor module comes with holes on one side to hold the clips of the heat sink and fan. The upper set of holes (near the latches) on the processor are wider and should match the wider ends of the clips on the heat sink. The lower set of holes are smaller and should match the narrow ends of the heat sink clips.

Figure 4- 24 Matching the Fan-Heat Sink Clips with the Holes on the Processor
Follow these steps when installing the heat sink and fan to the Pentium II processor module:
À Remove the thermal tape protector at the back of the heat sink.
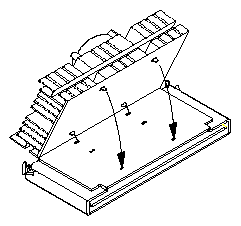
À Insert the wide clip ends to the wide holes on the processor and the narrow clip ends to the narrow holes.

Figure 4- 25 Inserting the Clip Ends to the Processor Holes
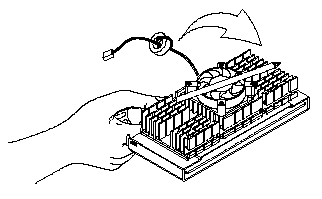
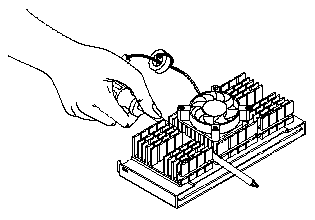
À Use a screwdriver to press and lock in the wide end of a clip first. Then without lifting the screwdriver, point it downward to press and lock the narrow end of the clip.

Figure 4- 26 Locking a Wide Clip End

Figure 4- 27 Locking a Narrow Clip End
À Repeat to lock clip on the other side.
|
Search Keywords |
| |
|
Hint Category |
Hardware Installation/Configuration, Processors | |
|
Date Created |
05-11-98 | |
|
Last Updated |
14-12-98 | |
|
Revision Date |
14-12-99 | |
|
Brand |
IBM Aptiva | |
|
Product Family |
Aptiva | |
|
Machine Type |
2138 | |
|
Model |
All | |
|
TypeModel |
| |
|
Retain Tip (if applicable) |
| |
|
Reverse Doclinks |