

|
428.389 bytes |
Product Information |
Document ID: DDSE-43TR9N |
Netfinity 7000 - Diagnostics
Applicable to: World-Wide
Diagnostics
The following tools are available to help you identify and resolve hardware-related problems:
Power-on self-test (POST)
POST beep codes
Test programs
Error messages
Error Log (Event Log)
Option Diskettes
Power-On Self-Test (POST)
Each time you power-on the system, it performs a series of tests that check the operation of the system and some options. This series of tests is called the power-on self-test, or POST. POST does the following:
Checks some basic system-board operations
Checks the memory operation
Starts the video operation
Detects and initializes ISA devices
Detects and configures EISA devices
Detects and configures PCI devices
Verifies that the diskette drive, hard disk drive, and other installed devices are working
Check the indicator lights on the front of the server and the back of the power supplies. Verify that all of the amber lights are off. If an amber lights are on, see Status Indicators on page 18 Verify that both green LEDs on the back of the power supplies are on. Verify that all server devices are operating properly. If a device is not operating properly, ensure that it is not defective and is installed correctly. Replace defective devices and reinstall any device that is not installed correctly.
If POST finishes without detecting any problems, a single beep sounds and the first screen of the operating system or application program appears. If no operating system is installed, the system prompts you to insert bootable media. Refer to the information that came with the ServerGuide package for instructions on installing an operating system.
If POST detects a problem, an error message appears on the screen. A single problem can cause several error messages to appear. When you correct the cause of the first error message, the other error messages probably will not appear on the screen the next time you power-on the system.
POST Beep Codes
POST generates one or more beeping sounds to indicate that the tests detect an error. One beep and the appearance of text on the monitor indicate successful completion of the POST. If the server halts before POST completes, one or more beeps are emitted to indicate that POST detects an error. For a complete list of beep codes, see Beep Codes on page 155.
Test Programs
Use the test (diagnostic) programs to test the IBM components of the system and some external devices. The amount of time required to test all components depends on the number of components. The more optional adapters and devices attached to the system, the longer the testing takes.
If you cannot determine whether a problem is caused by the hardware or by the software, you can run the test programs to confirm that the hardware is working correctly.
The Server diagnostic programs identify most problems associated with the major components of the system. These programs test the system board, hard disk drives, diskette drives, CD-ROM drives, RAM, serial and parallel ports, video adapter, printer, keyboard, and mouse.
Test options let you run groups of tests in a batch, specify parameters to use for each test (for example, video modes, port addresses, and so on), specify the number of passes you want to run (one to continuous), log the test results to a text format file, and save all test settings for future use.
Error Log
The error log (VIEWLOG.EXE) contains all the POST, system, and intermittent errors that occur in the server.
Note : The error log's default configuration setting is enable.
Use the ViewLOG.exe program located in the root directory on IBM Netfinity 7000 System CD-ROM to:
- View the error log
- Copy the error log to a diskette.
To reset the error log (when full), use the Resetlog.exe program located in the root directory on IBM Netfinity 7000 System CD-ROM. The program will prompt you for a yes/no to confirm the action before deleting the log.
Error Messages
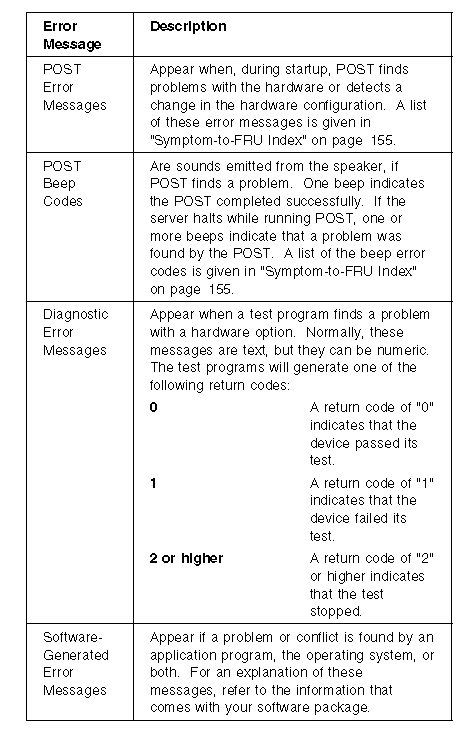
Messages generated by the software the operating system or application programs generally are text messages, but they also can be numeric. Basically, there are four types of error messages. These include POST error messages, diagnostic error messages, POST beep codes, and software-generated messages.
Option Diskettes
An optional device or adapter might come with a diskette. Option Diskettes usually contain diagnostic files or configuration files that the system needs to recognize and activate the option.
If the optional device or adapter comes with an Option Diskette, you might need to install some configuration (.CFG) files or diagnostic files (.EXE or .COM). See ISA or EISA Option Diskettes on page 27 for instructions on installing the configuration files.
The Startup Menu of the Diagnostic Tests
The Startup Menu is the starting point for all of the diagnostic tests. It contains the following selections:
Run Netfinity 7000 Diagnostics When you select this choice from the Startup Menu, the Diagnostics Menu appears. The Diagnostics Menu contain the following selections:
- Test allows you to specify an individual module (or device such as a diskette drive) for testing, or specify a group of tests for several modules. In addition, you can specify how many times to run an individual test and how the test program should note and log any errors it finds.
- Errors displays the error messages that the system has captured.
- Summary lists all tests that have been run, the run times, the number of times passed, the number of times failed, and the error messages.
- Configuration allows you to save a test configuration to run at a later time.
- Options allows you to set or change defaults that affect the reporting, error logging, and presentation of the error information.
Run Netfinity 7000 Memory Test (Quick - 5 min/64 MB): Provides a quick test of the system memory.
Run Netfinity 7000 Memory Test (Extensive - 15 min/64 MB): Provides a more extensive test of the system memory.
Run Advanced System Management Adapter Diagnostics. Provides a more extensive test of the processor(s).
Program Navigation
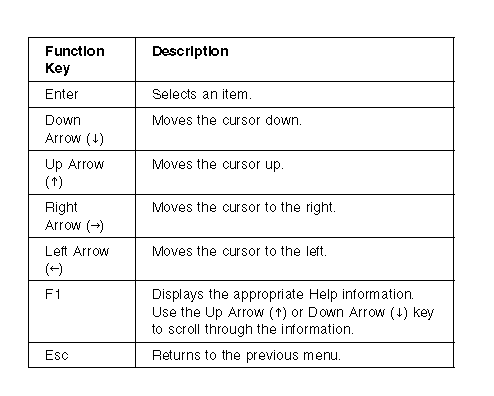
You can maneuver within the test programs by typing the first letter of a menu choice, or using the function keys.
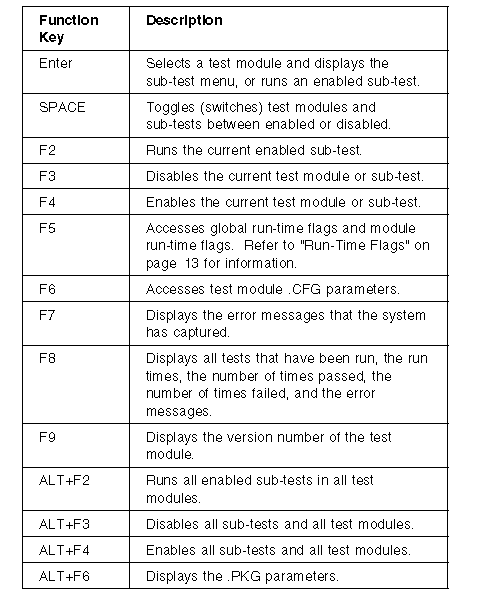
The following additional keys are active on the Test window. Press the TAB key from the Test window to view a description of all keys.
Command Line Options
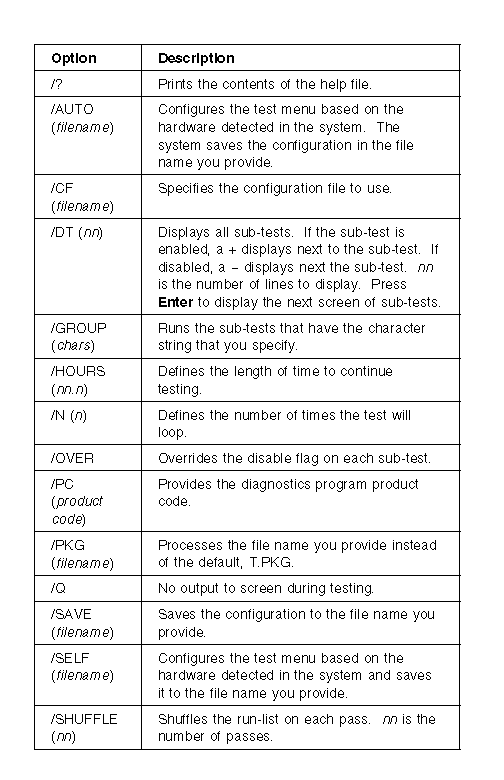
The Command Line Options allow you to define specific conditions for running the diagnostic programs from the DOS command line or at startup time.
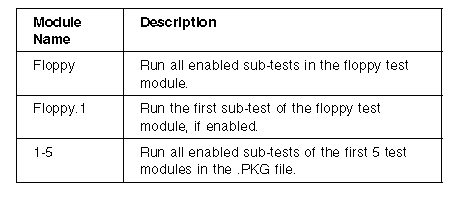
At the operating system prompt, type t xxxx yyyy (where xxxx represents a test and yyyy is a flag.
The test can be identified either by the module name or by it's position in the .PKG file, for example:
A command line option can contain the following flags:
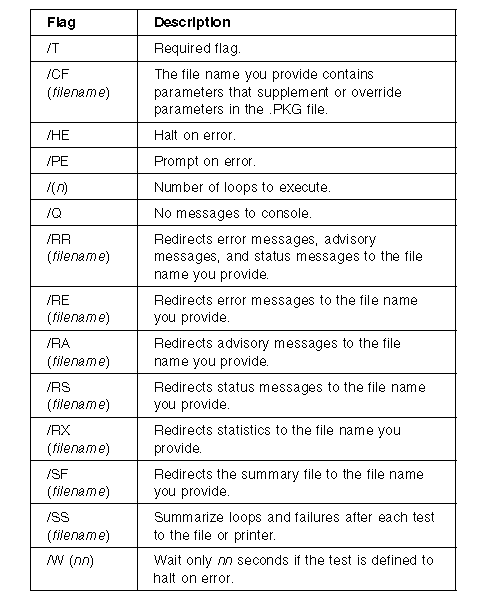
Run-Time Flags: The run-time flags are the commands that control execution of the tests. The Edit Run-Time Flags selection on the Options Menu provides access for editing the run-time flags.
Starting the Diagnostic Programs
To start the test programs from the System CD-ROM:
1. Use the Setup program to define the CD-ROM drive as the First Boot Device. Refer to Defining the Startup Device on page 44.
2. Insert the System CD-ROM into the CD-ROM drive.
3. Power-on the system. Or, if the system is powered on, press Ctrl+Alt+Del.
The system begins the power-on self-test (POST). If a user password has been set, the system prompts you to enter it.
Notes :
- If a user password is set, you must enter it to access the test programs. If you have set user and administrative passwords, you can enter either one.
- If a configuration error occurs, a prompt appears before the operating system starts (see Configuration Conflicts on page 26).
4. Use the Up Arrow or Down Arrow key to select Run System Diagnostics from the Startup Menu.
5. Use the Up Arrow or Down Arrow key to move the highlight bar to your desired Startup Menu selection.
6. Press Enter.
Note :
To stop running a specific test or stop testing after you have started a test, press CNTL+Break while the test is running. The test stops at the first possible opportunity.
The Test Window: When you select Test from the Diagnostics Menu, the Test window appears. The Test window allows you to select test modules and define testing parameters. Highlighted selections indicate a module or device selected for testing.
Using the Test Selection
To start the Test selection from the Startup Menu:
1. Start the diagnostic programs, see Starting the Diagnostic Programs on page 13.
2. Select Run Server Diagnostics from the Startup Menu; then, press Enter.
3. Use the Left and Right arrow keys to select Test. Use the Up Arrow or Down Arrow key to move the highlight bar from one selection to the next within the Test window.
You can also enter the number of your desired test to move the highlight bar.
4. Press Enter at the highlight bar of the desired test module.
5. Press the Spacebar at the highlight bar to enable the desired sub-test.
6. Press F2 to run the selected sub-test.
7. Select the number of passes and the length of processing time; then, press Enter.
If you want to run all enabled sub-tests, you can do so by pressing ALT+F2.
Creating Test Scripts: Scripting allows you to select specific groups of tests, sub-test, and parameters. You can then save your selections for later use as a test script.
To set up a test script:
1. Select Run Server Diagnostics from the Startup Menu; then press Enter.
2. Select Test from the Diagnostics Menu.
3. Select the tests, sub-tests, and parameters.
4. Select Configuration from the Diagnostics Menu.
5. Select Save Test Configuration.
6. Type in a file name and press Enter.
7. To load and run the test program with this test setting, type: T /CF filename and then, press Enter.
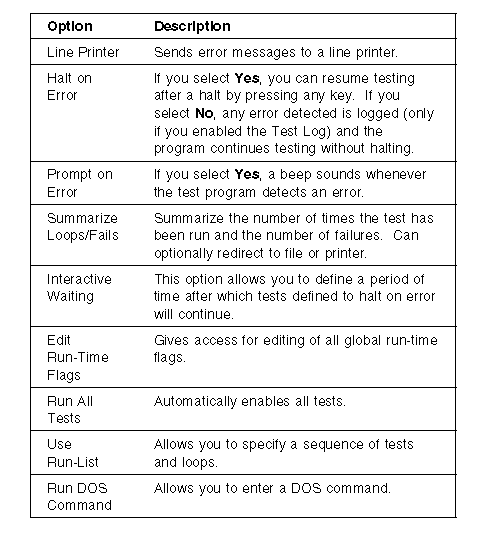
Options: The following is a brief description of each option that appears on the Options Menu.
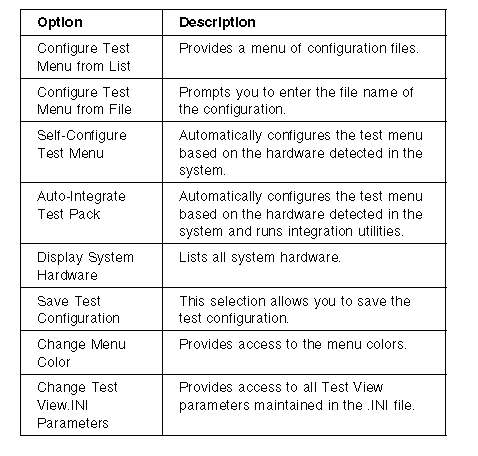
Configuration Menu: The following is a brief description of each option that appears on the Configuration Menu.
POST Error Codes and Messages
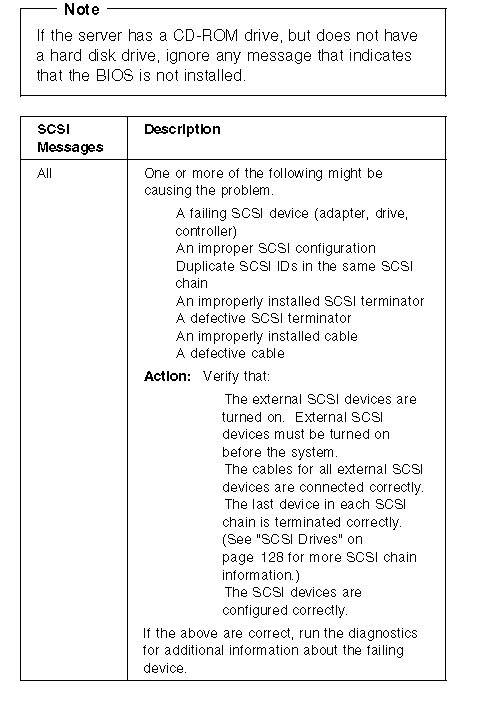
Error Codes and Messages might appear on the screen during the power-on self-test (POST).
Sometimes the first error to occur causes additional errors. In this case, the system displays more than one error message. Always follow the suggested action instructions for the first error message that appears.
POST error codes are also written to the error log in the Extended BIOS Data Area and can be viewed using the event log utility. For a complete list of error codes and messages, see Symptom-to-FRU Index on page 155.
|
Search Keywords |
| |
|
Document Category |
Diagnostics | |
|
Date Created |
04-01-99 | |
|
Last Updated |
04-01-99 | |
|
Revision Date |
04-01-2000 | |
|
Brand |
IBM PC Server | |
|
Product Family |
Netfinity 7000 | |
|
Machine Type |
8651 | |
|
Model |
ALL | |
|
TypeModel |
| |
|
Retain Tip (if applicable) |
| |
|
Reverse Doclinks |