
|
67.502 bytes |
Service Hints & Tips |
Document ID: PMYS-3J4NT3 |
Aptiva - How to run Mwave QuickTests
Applicable to: World-Wide
This document applies to all Aptiva systems that have Mwave modems. To find the latest Mwave drivers for your system, click here.
The following procedure will perform basic tests on the Mwave sound/modem card to verify its functionality.
Starting the Quick Test program
1. Close all of your open programs.
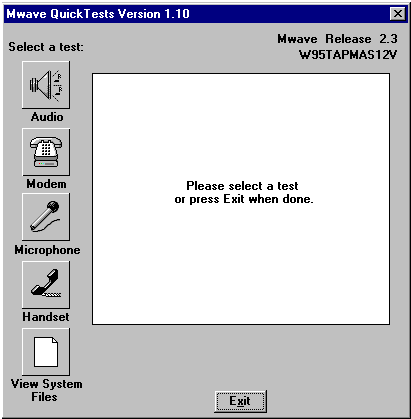
2. Click "Start", "Programs", "Mwave", "Mwave Quick Tests" to start the program. You should see the following window.

Figure #1
3. You can exit the Mwave Quick Tests at any time by clicking the "Exit" button.
Running the audio test
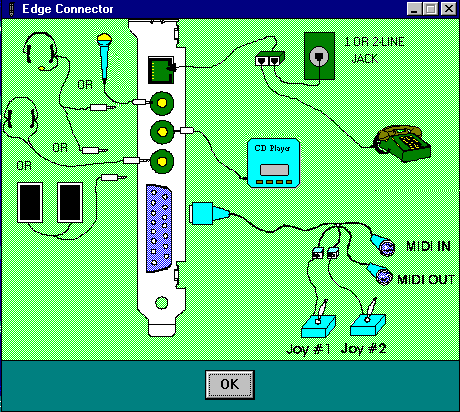
1. Make sure your speakers are turned on and plugged in correctly. If you are not sure where to plug the speakers in, you can view a wiring diagram of the Mwave card by clicking "Start", "Programs", "Mwave", "View Connectors".

Figure # 2
2. Click the button labeled "Audio."(shown in Figure #1) You will see the message "Playing audio clip..." displayed briefly, and you should here a clear voice say "Your audio playback is working."
3. When playback is complete, you will see a message that reads "Did you hear the audio sample?" If you heard the voice, click "Yes" to continue. If you did not hear the voice, skip to the "When a test fails" section of this document.
Running the modem test
1. Make sure the phone line and speakers are properly connected to the back of the Mwave, and that the Mwave phone splitter is in place. If you are unsure of how to connect the phone line or speakers, you can view a wiring diagram of the Mwave card by clicking "Start", "Programs", Mwave "View Connectors" (shown in figure #2).
2. Click the button labeled "Modem."(shown in Figure #1). You will see a message that reads "Do you have a phone line connected to the Mwave adapter?" Click "Yes".
3. The Quick Tests program will attempt to locate your modem and force it to pick up the phone line. If it is successful, you will hear a dialtone through the speakers.
4. If you hear the dialtone, click "Yes" when you see the prompt "Do you hear a dialtone?" If you do not hear the dialtone, skip to the "When a test fails" section of this document.
Running the microphone test
1. Make sure the microphone and speakers are properly connected to the back of the Mwave, and that the speakers are turned on. If you are unsure of how to connect the phone line or speakers, you can view a wiring diagram of the Mwave card by clicking "Start", "Programs", "Mwave", "View Connectors".
2. Click the button labeled "Microphone."(shown in Figure #1) You will see a message that reads "Do you have a microphone connected to the Mwave adapter?" Click Yes.
3. You will see a message prompting you to "Speak, sing, or blow into the microphone." Speak at an even voice directly into the microphone; you should be able to hear your voice through the speakers.
4. If you hear your voice, click "Yes" beneath the prompt "Do you hear your voice coming from the speakers?" If you do not hear your voice, skip to the "When a test fails" section of this document.
Running the handset test
1. This test will test the functionality of a telephone handset connected through the Mwave via the Mwave splitter. Make sure the phone line is properly connected to the back of the Mwave, and that the Mwave phone splitter is in place. You will also need to verify that the splitter is hooked up properly, as attaching it in reverse order will cause this test to fail. If you are unsure of how to connect the phone line or splitter, you can view a wiring diagram of the Mwave card by clicking
"Start", "Programs", "Mwave", "View Connectors".
2. Click the button labeled "Handset"(shown in Figure #1). You will see a message that reads "Do you have a telephone handset connected to the Mwave adapter?" Click Yes.
3. The Quick Tests program will attempt to locate your modem, and then you will be given instructions for the handset test. When you have read them, pick the handset up, and then put it back down. You should see messages in the Quick Tests window that indicate when the handset was picked up, and when it was placed back on the hook.
4. If you see the messages, click "Yes" beneath the prompt that reads "If you see these messages press "Yes", otherwise, press "No". If you do not see the messages, skip to the "When a test fails" section of this document.
When a test fails
If any of the Mwave quick tests fail,and you have to answer "No" to any of the questions asked after the tests, then you will be given a list of simple connections and settiings you can check. Verify that all these settings are correct, and try the test that failed again. If the test continues to fail, you may have a problem with your Mwave,and further problem determination will be required to find a solution.
|
Search Keywords |
| |
|
Hint Category |
Mwave, Diagnostics | |
|
Date Created |
16-06-97 | |
|
Last Updated |
01-12-98 | |
|
Revision Date |
13-11-99 | |
|
Brand |
IBM Aptiva | |
|
Product Family |
Aptiva | |
|
Machine Type |
2134, 2144, 2159, 2168, 2176 | |
|
Model |
C23; C31; C32; C33; C35; C3X; C53; C55; C5X; C65; C66; C67; C6B; C6D; C6E; C6V; C6X; C6Y; C73; C77; C7X; 6R8; 6R9; 7R0; 7R1; 7R2; 7R3; 7R6; 7R7; 7R9; 8R1; 8R6; 8R8; 9R2; 9R3; 9R4; 9R5; 9R6; F23; F31; F32; F33; F35; F67; F6B; M40; M41; M53; M54; M55; M56; M57; M58; M60; M61; M62; M70; M71; M72; M91; A40; A44; A45; A50; A51; A52; A90; A92; A94; 2R6; 3R5; 4R2; 4R7; 2R9; 3R3; 3R1; 4R8; 3R0; 3R7; 4R0; 4R9; 3R8; 3R9; 4R3; 5R5; C40; C41; C45; C53; C61; M30; M31; M35; M50; M51; M52; M63; A10; A12; A14; 2R0; 2R3; 2R0; 2R3; 2R5; 2R7; 2R8; 3R4; 3R6; 4R1; 5R1; 6R3; C30; C31; C51; C21; 6R6; 132; 142; 152; 154; 162; 163; 172; 182; L15; L16; K25; K26; L33; K33; L43; K43; L35; K35; L45; K45; KU5; L55; K55; L65; K65; L66; K66; U15; U16; U33; U43; U35; U45; U55; U65; U66; X17; X27; X37; X47; Y17; Y27; Y37; Y47; Z17; Z27; Z37; Z47; S55; S65; S64; S74; S75; W37; W47; S20; 932; 9W2; LL5; LL6; L50; L60; K50; K60; LL1; LL2; LL3; LL4; L10; L20; L30; L40; K10; K20; KU6; K30; K40; KU4; X40; Y40; Z40; N50; N51; N60; N61; N71; Y10; Y20; Y30; Z10; Z20; Z30; X10; X20; X30; W30; N30; N40; N41; 352; 354; 355; 356; 357; 362; 363; 364; 372; 374; 381; 382; 384; 392; 442; 443; 447; 449; 454; 6R8; 6R9; 7R0; 7R1; 7R2; 7R3; 7R6; 7R7; 7R9; 8R1; 8R6; 8R8; 9R1; 9R3; 9R4; 9R5; 9R6; C23; C31; C32; C33; C35; C3X; C53; C55; C5X; C65; C66; C67; C6B; C6D; C6E; C6X; C6Y; C6Z; C73; C77; C7X; F23; F31; F32; F33; F35; F67; F6B; H54; H55; H56; H5E; H5F; H64; H65; H6D; H6E; H6F; H7E; H7F; H7G; J33; J35; J3C; J3E; J3K; J3L; J3V; J3W; J3Y; J3Z; JCL; K53; J62; K74; L53; L62; P53; P62; T01; T33; T34; T62; T63; T65; T71; V34; V65; V71; W33; W55; W65; X01; X31; X33; X34; X52; X62; X63; X65; X71; Y01; Y04; Y31; Y33; Y34; Y52; Y62; Y63; Y65; Y71; Z01; Z31; Z33; Z34; Z52; Z62; Z63; Z65; Z71; 446; 6R6; C21; J31; J3A; J3X; J51; J52; JDA; JSN; K01; K21; K22; K23; K31; K32; K52; L01; L21; L22; L23; L31; L32; L52; L6T; P01; P21; P22; P23; P31; P32; P52; 13R; 14R; 15R; 16R; 19R; 20R; S64; S66; S74; S76; S78; S7H; C6Z; 9R1 | |
|
TypeModel |
| |
|
Retain Tip (if applicable) |
| |
|
Reverse Doclinks |