
|
51.999 bytes |
Service Hints & Tips |
Document ID: PMYS-3LLPGT |
Aptiva - 2137 Processor removal
Applicable to: World-Wide
NOTE: Determine the type of processor you are installing and make sure the jumpers are set correctly. Run the Setup Utility after correctly installing a processor.
ATTENTION: Processors are sensitive to static discharge.
1. Remove adapter cards if applicable.
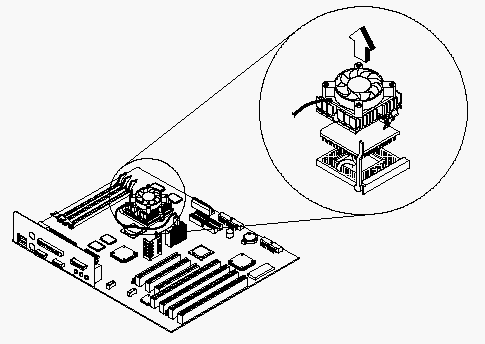
2. Detach the heat sink cable from the fan connector FN1.
3. Remove the fan sink by pressing the release tab (rectangular end) and lifting it up from the Processor.
4. Pull up the ZIF socket release lever.
5. Lift the processor out of the socket.

NOTE: Processor Install
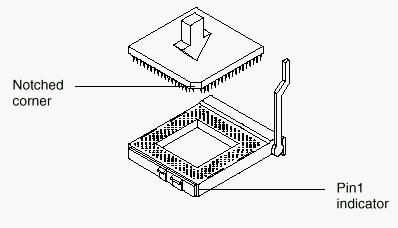
1. Place the ZIF socket release lever to the release (up) position.
2. Insert the new processor, matching the notched corner of the processor with pin the 1 indicator on the socket.

3. Push down the lever to lock the processor to the socket.
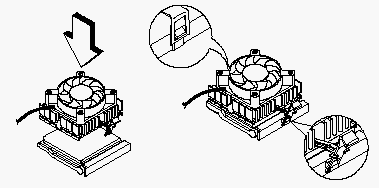
4. Place the processor heat sink fan over the processor.
5. Insert one side of fan brace onto the ZIF socket
6. Secure by latching the other side to the ZIF socket.
7. Reconnect the processor fan sink cable to the connector FN1 on the system board.

|
Search Keywords |
| |
|
Hint Category |
Hardware Installation/Configuration, Processors, System Boards | |
|
Date Created |
04-09-97 | |
|
Last Updated |
15-12-98 | |
|
Revision Date |
14-12-99 | |
|
Brand |
IBM Aptiva | |
|
Product Family |
Aptiva | |
|
Machine Type |
2137 | |
|
Model |
All | |
|
TypeModel |
| |
|
Retain Tip (if applicable) |
| |
|
Reverse Doclinks |