
|
63.705 bytes |
Service Hints & Tips |
Document ID: MNOK-3SWVAW |
Aptiva - How to set video adapter and monitor type in Windows 95 OSR1
Applicable to: World-Wide
Note: This procedure will cover Windows 95 versions 4.00.950 and 4.00.95a which are the OEM version OSR1. This procedure expects that the monitor and adapter is set up correctly in the BIOS. The correct adapter and monitor types must be known. Consult the user's manual for the system unit or the monitor to get the correct settings. If the documentation is
unavailable, consult IBM's electronic support or other technical support to get the correct adapter and files if needed.
Windows 95 Version:
To determine which version of Windows 95 that is on the machine, right mouse click on the My Computer icon in the upper right of the desktop. On the menu that appears, click on Properties. The System Properties window will come up with the General Sheet in front. If the General Sheet is not in front, click the General Tab to bring it forward. On the upper right side of the window, there will be text which says System, Microsoft Windows 95, and the version. Version 4.00.950 and 4.00.95a are OSR1 while version 4.00.095 B is OSR2. There are slight differences in the video adapter and monitor setups.
1. Click on the start button and go to Settings and Control Panel. Click on Control Panel. The Control Panel Window will open.
2. In the Control Panel Window, find the Display Icon. If the display icon does not show, scroll up using the scroll bar on the right side until the Display Icon is displayed. Double-click on the Display Icon. The Display Properties Window should open.
3. In the Display Properties Window, there will be at least four tabs which say Background, Screen Saver, Appearance, and Settings. Click on the Settings Tab to bring the Settings Sheet forward.
4. At the bottom of the settings sheet is the Change Display Type Button. Click on the button. This should open up the Change Display Type window shown below.
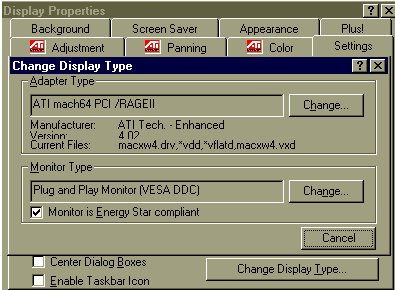
Figure 1 - Change Display Type window
5. In these versions, the adapter and the monitor are located on the same sheet. To change the monitor or the adapter, the process is the same.
Adapter:
6. To change the Adapter type, click on the Change button and the Select Device Window will open. Click on the button next to the text Show All Devices and the screen should look like the screen in the figure below.
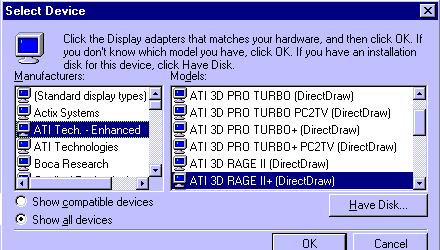
Figure 2 - Select Device window
7. Scroll down the Manufacturer's list until the Manufacturer's type is selected. Typically, this selection will be S3 or Cirrus Logic. Click on the manufacturer and the right side should show the video chipsets selections from the manufacturer.
8. On the right side, click on the appropriate chipset. The manufacturer selected above is ATI Technologies - Enhanced and the chipset is the ATI 3D Rage II + (Direct Draw). Click the OK button to select these drivers.
9. If there are update drivers on a diskette, insert the floppy into the floppy diskette drive and click the Have Disk Button. A dialog box will appear with A:\ in the text box and an OK button. Click the OK button and the system will find the driver on the diskette and show a dialog with that adapter. Click the OK button.
10. After changing the adapter and clicking the Ok button, the Change Display Type window will return. Click the Close button and this will return the Display Properties window. Click the apply button to complete the setup. The system will have to be restarted for the system's changes to take affect.
Monitor:
11. To change the monitor type, click the Change button and the Select Device Window will open.
12. In the Select Device Window, click the circle next to the text Show All Devices. This should show the Manufacturer and the Models. It should look like the video adapter Select Device Window in Figure 2.
13. Select the Manufacturer on the left side by click on the manufacturer of your monitor. The selections on the right side should change to show the known monitors for that manufacturer. Click on the correct model and click the OK button. This will return the computer to the Change Display Type. Click the Close button to return to the Display Properties Window. Click the Apply button to complete the setup of the monitor. The computer will have to be restarted to have the new settings take effect.
14. If the monitor is not found, you will have to contact the manufacturer for an appropriate selection. If the manufacturer is not listed in the Manufacturer selection then you will have to contact the manufacturer for an appropriate selection. If there is no settings that can be used under the manufacturer selections, the monitor can be set up with generic settings.
15. Generic monitor settings are selected by scrolling up the manufacturer's selection side until (Standard Monitor Types) appears in the manufacturer's list. On the right side, standard monitor types will show up. Consult your owners manual for an appropriate setting. General settings are Standard VGA 640X480 for a 14 inch, Super VGA 800X600 for a 15 inch, and Super VGA 1024X768 for a 17 inch. These settings are conservative. You will have to consult the monitors manufacturer or the user's manual for appropriate settings.
|
Search Keywords |
| |
|
Hint Category |
Display/Monitor, Video, Windows 95 | |
|
Date Created |
26-03-98 | |
|
Last Updated |
01-06-98 | |
|
Revision Date |
29-05-99 | |
|
Brand |
IBM Aptiva | |
|
Product Family |
Aptiva | |
|
Machine Type |
2134, 2144, 2159, 2168, 2176 | |
|
Model |
351; 353; 361; 440; 445; 446; 6R6; C21; J31; J3A; J3X; J51; J52; JDA; JSN; K01; K21; K22; K23; K31; K32; K52; L01; L21; L22; L23; L31; L32; L52; L6T; P01; P21; P22; P23; P31; P32; P52; M31; C31; 3R4; M41; C41; 3R5; M51; C51; 3R6; M52; 4R1; M53; C53; 4R2; M55; 2R9; M56; 3R3; M57; 3R1; M61; C61; 3R7; M62; 4R0; M63; 4R9; M71; 3R9; M72; 4R3; M91; 5R5; 900; 910; 911; 91W; 914; 921; 92W; 931; 93W; 932; 9W2; 934; 935; 937; 930; 941; 94W; 951; 95W; 964; 96W; LL1; LL2; LL3; LL4; LL5; LL6; X10; X20; X30; W30; X40; Y10; Y20; Y30; Y40; Z10; Z20; Z30; Z40; N30; N40; N41; N50; N51; N60; N61; N71; A10; A12; A14; A15; A40; A44; A45; A50; A51; A52; A90; A92; A94; C45; 120; 121; 123; 131; 132; 133; 141; 142; 152; 154; 161; 162; 163; 171; 172; 182; L11; L15; L16; K25; K26; L33; K33; L43; K43; L35; K35; L45; K45; KU5; L55; K55; L65; K65; L66; K66; U11; U15; U16; U33; U43; U35; U45; U55; U65; U66; X17; X27; X37; X47; Y17; Y27. Y37; Y47; Z17; Z27; Z37; Z47; S20; S50; S55; S65; S64; S74; S75; W37; W47; 13R; 14R; 15R; 16R; 19R; 20R; B60; B65; B75; B80; B85; B95; S64; S66; S74; S76; S78; S7H; 352; 354; 355; 356; 357; 362; 363; 364; 372; 374; 381; 382; 384; 392; 442; 443; 447; 449; 454; 6R8; 6R9; 7R0; 7R1; 7R2; 7R3; 7R6; 7R7; 7R9; 8R1; 8R6; 8R8; 9R1; 9R2; 9R3; 9R4; 9R5; 9R6; C23; C31; C32; C33; C35; C3X; C53; C55; C5X; C65; C66; C67; C6B; C6D; C6E; C6V; C6X; C6Y; C6Z; C73; C77; C7X; F23; F31; F32; F33; F35; F67; F6B; H54; H55; H56; H5E; H5F; H64; H65; H6D; H6E; H6F; H7E; H7F; H7G; J33; J35; J3C; J3E; J3K; J3L; J3V; J3W; J3Y; J3Z; JCL; K53; J62; K74; L53; L62; P53; P62; T01; T33; T34; T62; T63; T65; T71; V34; V65; V71; W33; W55; W65; X01; X31; X33; X34; X52; X62; X63; X65; X71; Y01; Y04; Y31; Y33; Y34; Y52; Y62; Y63; Y65; Y71; Z01; Z31; Z33; Z34; Z52; Z62; Z63; Z65; Z71 | |
|
TypeModel |
| |
|
Retain Tip (if applicable) |
| |
|
Reverse Doclinks |