
|
55.243 bytes |
Service Hints & Tips |
Document ID: MCGN-3PSQFA |
|
This document is provided to IBM and our Business Partners to help sell and/or service IBM products. It is not to be distributed beyond that audience or used for any other purpose. |
PCServer330 - Diagnostics and Test Information
Applicable to: World-Wide
Diagnostics and Test Information
The following tools are available to help identify and resolve hardware-related problems:
Power-on self-test (POST)
POST beep codes
Test programs
Error messages
Option Diskettes
Power-On Self-Test (POST)
When you power-on the system, it performs a series of tests to check the operation of the system and some options. This series of tests is called the power-on self-test, or POST.
POST does the following:
- Checks some basic system-board operations
- Checks the memory operation
- Compares the current system configuration with the stored system configuration information
- Starts the video operation
- Verifies that drives (such as the diskette, CD-ROM, and hard disk drives) are working
If a power-on password or administrator password set, you must type the password and press Enter before POST will continue.
The level of password protection determines the number of choices that are available on the Configuration/Setup utility program menu.
While the memory is being tested, the amount of available memory appears on the screen. These numbers advance as the system progresses through POST. If POST finishes without detecting any problems, a single beep sounds and the first screen of your operating system or application program appears.
If POST detects a problem, an error message appears on your screen. A single problem might cause several error messages to appear. When you correct the cause of the first error message, the other error messages probably will not appear on the screen the next time you turn on the system.
POST Beep Codes
POST generates beeping sounds to indicate successful completion or the detection of an error.
One beep and the startup of the operating system or application program indicates successful completion of POST. More than one beep indicates that POST detected an error.
For a complete list of beep codes, see Symptom-to-FRU Index.
Test Programs
The PC Server Diagnostics program includes the diagnostic test programs, which are stored in nonvolatile read-access memory (NVRAM) in the server. These programs are the primary method of testing the system board, memory, and many other options that you can install in the PC Server 330.
You can use the programs to test the IBM components of the system and some external devices. The more optional adapters and devices you have attached to your system, the longer the testing takes.
If you cannot determine whether a problem is caused by the hardware or by the software, you can run the test programs to confirm that the hardware is working correctly.
The PC Server Diagnostics programs include tests that identify most problems associated with major components of your system, such as the serial ports, the video controller, the keyboard and the mouse.
Types of Error Messages
Error messages indicate that a problem exists.
Messages generated by the software generally are text messages, but they also can be numeric. There are four types of error messages: POST error messages, beep codes, diagnostic error messages, and software-generated messages.
POST Error Messages: POST error messages appear when, during startup, POST finds problems with the hardware or detects a change in the hardware configuration. A list of these error messages is given in POST Error Message Table on page 21.
Diagnostic Error Messages: Diagnostic error messages appear when a test program finds a problem with a hardware option. Normally, these messages are text, but they can include an alphanumeric identifier.
When the diagnostic tests automatically start following a signal from NetFinity, the server saves the errors in the error buffer. Otherwise, the error messages display on the screen, and can be stored in nonvolatile read-access memory.
Software-Generated Error Messages: These messages appear if a problem or conflict is found by an application program, the operating system, or both. For an explanation of these messages, refer to the information that comes with your software package.
About the Test Programs
The following is useful information about navigating through the test programs, as well as procedures for starting and stopping them. These programs are designed to test the PC Server 330 - Type 8640. Non-IBM products tested with these programs might present misleading error messages or unexpected system responses. If you want to test a non-IBM product, refer to the information that comes with that product.
You can start the diagnostics programs from the Configuration/Setup utility program.
Characteristics of the Diagnostics
Menu driven
Supports single runs or multiple runs of selected diagnostic tests
Reports errors to screen
Saves errors to the Diagnostic Log
Using the System Diagnostics: To start the diagnostic program:
1. Power-on the server and watch the screen. Or, if the system is turned on already, press Ctrl+Alt+Del.
2. When the Press F1 to enter Configuration/Setup message appears, press F1. If a power-on or administrator password is set, the system prompts you for it. The Diagnostic/Setup Utility Menu appears.
3. Select Diagnostic Utility; then, press Enter.
4. After a few moments, the Diagnostics Utility Menu appears.
a. Select Run Diagnostic to choose which system components to test, and the number of times the server will run the tests.
b. Select Diagnostic Log to display the results of the most recent diagnostic tests.
If the server stops during testing and you cannot continue, replace the device that was being tested when the test stopped.
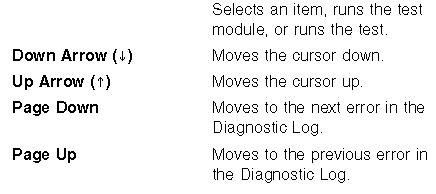
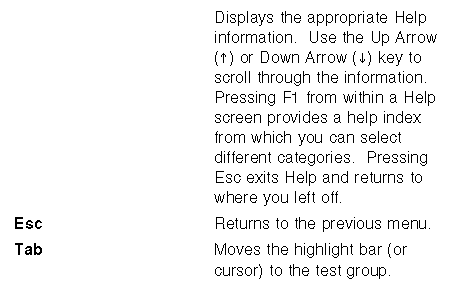
Program Navigation: You can use the following keys to maneuver within the test programs:


Diagnostics Mode
When you start the diagnostic test programs from the Configuration/Setup menu, you can select the tests and the number of times the tests run.
Some choices on the Diagnostic menu display a menu, so that you can further customize the test program.
|
Notes |
Running the Diagnostics: To use the Diagnostics:
1. Power-on the server and watch the screen. Or, if the system is powered on already, press Ctrl+Alt+Del.
2. When the message "Press F1 to enter Configuration/Setup" appears, press F1. If a password is set, the system prompts you for it. The Diagnostic/Setup Utility Menu appears.
3. Select Diagnostic Utility; then, press Enter. The Diagnostic Utility Menu appears.
4. Select Run Diagnostic; then, press Enter. The server displays the "How Many?" menu:
Stop on Error stops the test programs when the Single or Loop diagnostic tests encounter an error. The Endless Loop choice automatically stops on error.
Reset Run List clears previously defined diagnostic test selections from memory.
Reset Result Buffer clears the results of the last diagnostic tests.
Single runs the selected tests one time.
Loop Count runs the selected tests up to a maximum of 254 times, and saves all tests results. Running the test multiple times can be useful to confirm that a hardware or software change has corrected a component failure.
Endless Loop runs the selected tests until stopped manually or until the tests encounter an error. Running the test over an extended time can help to identify the cause of an intermittent component failure.
5. Press Enter. The test selection menu displays.
6. Press the arrow keys to move between the choices on the menu. Press Enter to select or deselect the choice.
All runs all tests on the menu. When you select this choice, all of the other choices change to Y (selected).
System Board tests the CMOS, RTC, and timers
CPU tests the microprocessor(s) on the processor board.
DRAM Memory tests all system memory in all DIMM slots.
Diskette A tests the diskette drive and controller.
Parallel port tests the parallel port.
Serial port tests the serial port.
Keyboard tests the keyboard.
Ethernet tests on-board Ethernet functions.
SCSI refers to the Diagnostic and Test section of the HMM to test using the SCSI diagnostic diskette.
Mouse tests the device connected to the mouse port.
Video to test the monitor.
7. Select Run Diagnostics. The diagnostic program then runs the tests for each of the selected devices or modules.
8. Press Esc twice to return to the Diagnostic Utility Menu.
9. Select Diagnostic Log to view the results of the diagnostic tests.
10. Press Esc to return to the Diagnostic Utility Menu.
11. Press Esc to exit from the Diagnostic/Setup Utility Menu. The server restarts.
Viewing the Test Results: To view the results of the system diagnostics:
1. Power-on the server and watch the screen. Or, if the system is turned on already, press Ctrl+Alt+Del.
2. When the message Press F1 to enter Configuration/Setup appears, press F1. If a password is set, the system prompts you for it. The Diagnostic/Setup Utility Menu appears.
3. Select Diagnostic Utility; then, press Enter. The Diagnostic Utility Menu appears.
4. Select Diagnostic Log. The server displays the test results.
5. Press Page Down to view any additional test results.
6. Press Esc to return to the Diagnostic Utility Menu.
7. Press Esc to exit from the Diagnostic/Setup Utility Menu. The server restarts.
SCSI Tests (Adaptec) Diskette
The following information supports the diagnostic tests on the SCSI Test (Adaptec) diskette (form number S430-6816-00)
|
Notes |
Running the Tests:
To start SCSI Test (Adaptec) Diskette, do the following.
1. Power-off the server.
2. Insert the SCSI Test (Adaptec) Diskette into diskette drive A:
3. Power-on the server. The following menu is displayed:
|
SCSI TEST MENU ) EXIT |
|
Note |
4. Select the mode you want to run; then, press Enter. See "SCSI Test Modes".
5. Select the SCSI device you want to test. See "Selecting a SCSI Device".
Note
If the SCSI bus scan fails to find a device that you know is installed in the server and you want to test it, see Manually Selecting a SCSI Device.
6. Select the test you want to run.
- If you selected Standard Mode, see "Selecting a Test (Standard Mode)".
- If you selected Advanced Mode, see "Selecting a Test (Advanced Mode)".
SCSI Test Modes:
Two modes for testing are available.
|
Modes |
Description |
|
Standard |
Offers a set of basic non-destructive test (with the exception |
|
Advanced |
Offers a greater choice of test. To fully utilize the functions |
Selecting a Test (Standard Mode):
The following test are available in standard test mode for the devices listed.
|
Device |
Test |
|
SCSI Hard Disk Drives |
0 - Device Diagnostics |
|
SCSI CD-ROM Drives |
0 - Device Diagnostics |
|
SCSI Tape Drive Drives |
0 - Device Diagnostics |
Test Descriptions (Standard Mode)
|
Test |
Description |
|
Device Diagnostics |
Sends a command requesting the SCSI device to perform a |
|
Test Unit Ready |
Sends a SCSI Test Unit Ready command to the device and will |
|
Get Device Status |
Displays the status of the last command sent to the device and is |
|
Read Test |
Reads the entire media of the SCSI device. A status bar showing the test |
|
Read / Write Test |
Attention |
|
Search Keywords |
| |
|
Hint Category |
Hardware Maintenance Information | |
|
Date Created |
15-12-97 | |
|
Last Updated |
04-06-98 | |
|
Revision Date |
03-06-99 | |
|
Brand |
IBM PC Server | |
|
Product Family |
PC Server 330 | |
|
Machine Type |
8640 | |
|
Model |
11Y; 21Y; PB0; PM0; PT0 | |
|
TypeModel |
| |
|
Retain Tip (if applicable) |
| |
|
Reverse Doclinks |