
|
42.415 bytes |
Service Hints & Tips |
Document ID: JWOE-3LDNNW |
Aptiva - 2137 CD-ROM drive jumper settings
Applicable to: World-Wide
CD-ROM Drive Information and Jumper Settings
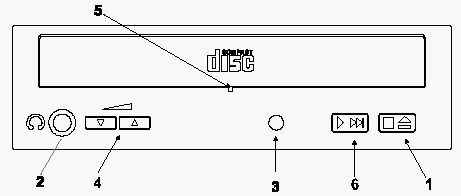
Attention: Either <option 1> or <option 2> CD-ROM drive may come with your Aptiva machine. Their front panel buttons, indicators and emergency eject method could be different.

|
Item |
Description |
|
1 |
Load / eject button |
|
2 |
Headphone jack |
|
3 |
Power-on / busy indicator, lights up in green color while disc is set in ready state; lights up and flashes in amber color during data read or seek operation. |
|
4 |
Headphone volume control |
|
5 |
Emergency eject hole. |
|
6 |
Audio Play/Skip track control button. |
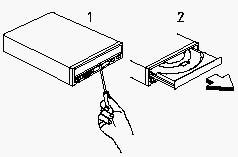
CD - ROM Emergency-exit <option 1>
|
|
If for any reason the tray does not eject |

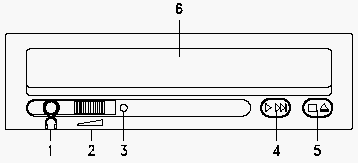
Figure 5- 12 CD-ROM Front Panel <option 2>
Table 5- 11 CD-ROM Front Panel Introduction <option 2>
|
Item |
Description |
|
1 |
Headphone jack |
|
2 |
Headphone volume control |
|
3 |
Busy indicator, lights up and flashes in amber color during data read or seek operation. |
|
4 |
Audio Play/Skip track control button |
|
5 |
Load / eject button |
|
6 |
Disc tray and emergency eject |
CD-ROM Emergency-exit Option <2>

Locate the bottom edge of the disc tray. Gently pry the disk tray open with a screwdriver. When the disc tray opens, simply remove the disc from the CD-ROM drive.
CD-ROM Drive Rear Panel Connectors and Features

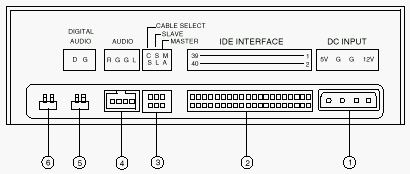
Figure 5- 13 CD-ROM Rear Panel
Note: CD-ROM drives may come with no item 5 and 6 (digital audio output and testing jumper) connectors.
Table 5- 12 CD-ROM Drive Rear Panel Connectors and Features
|
Item |
Function |
Connect to... |
|
1 |
Power supply connector |
Power supply |
|
2 |
Interface connector |
System board (CN10) |
|
3 |
Configuration jumper. See table 5-13 |
- - |
|
4 |
Audio line out connector |
System board (CN6) |
|
5 |
Digital audio output |
- - |
|
6 |
Testing jumper is reserved for |
- - |
CD-ROM Drive Jumper Settings
Table 5-13 CD-ROM Drive Jumper Settings
|
CS |
SL |
MA |
DESCRIPTION |
|
- - |
- - |
On |
Drive configured as a Master |
|
- - |
On |
- - |
Drive configured as a Slave |
|
On |
- - |
- - |
Cable select |
|
Search Keywords |
| |
|
Hint Category |
Hardware Installation/Configuration, CD-ROM Drives, Jumper/Switch Settings | |
|
Date Created |
28-08-97 | |
|
Last Updated |
11-01-99 | |
|
Revision Date |
11-01-2000 | |
|
Brand |
IBM Aptiva | |
|
Product Family |
Aptiva | |
|
Machine Type |
2137 | |
|
Model |
All | |
|
TypeModel |
| |
|
Retain Tip (if applicable) |
| |
|
Reverse Doclinks |