
|
233.945 bytes |
Service Hints & Tips |
Document ID: DDSE-46AK8S |
Netfinity 5000 - Installing a Server in a Rack Enclosure
Applicable to: World-Wide
Installing a Server in a Rack Enclosure
Use the following instructions for installing a Netfinity 5000 rack model in a server rack enclosure.
- If you have a rack model, your server comes with the necessary rack mounting hardware. Review the preinstallation information in Before You Begin; then, continue at Installing the Rack Model in a Rack Enclosure.
- If your Netfinity 5000 is a tower model and you want to install it as a rack model in a server rack enclosure, you must order the Netfinity Rack Mount Kit. This kit contains the appropriate front, top, and bottom covers, in addition to the brackets and the cable-management arm that you need to install the server into the rack. Follow the instructions that are included in the Rack Mount Kit.
Before You Begin
You will need the following items:
- Flat-blade screwdriver
- 8-inch adjustable wrench or pliers
- Tape
- Pencil
Some of the installation procedures require two people.
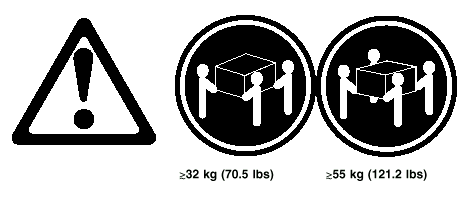
Before you begin to install your server in the rack enclosure, review the safety and handling guidelines specified under Safety Information. These guidelines will help you work safely while working with your server and options.
Review the documentation that comes with your rack enclosure for additional safety, cabling, and operating considerations.
To ensure cabinet stability, install the servers starting from the bottom of the rack enclosure.
|
Note |
Installing the Rack Model in a Rack Enclosure: During this procedure, you must install parts on the rack enclosure and the server. This process can be divided into three parts:
- Preparing the server
- Preparing the rack enclosure
- Installing the server into the rack enclosure
Before you begin
- Read Safety Information and the safety information in your rack enclosure documentation.
- Turn off the server, if it is on.
- Refer to your rack enclosure documentation for additional information on preparing the rack.
Preparing the Server: In this section, you will use the following parts:
- One cable arm bracket
- The inner slide from two slide bracket assemblies
- 6 pan-head short screws (M4 by 5 mm)
|
Caution |
|
Attention |
To prepare the Netfinity 5000 for installation in a rack enclosure:
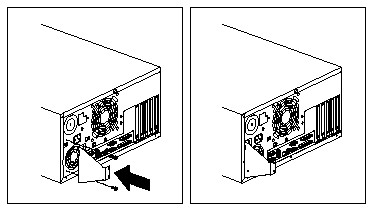
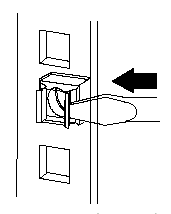
1. Attach the cable-arm bracket to the rear of the server.
a. Remove the two screws at the left of the primary power supply.
b. Align the cable-arm bracket with the screw holes, keeping the solid arm of the bracket toward the side of the server. Make sure the openings in the bracket align with the power supply LEDs and the fan.
c. Attach the bracket with the two screws you removed in step 1a.
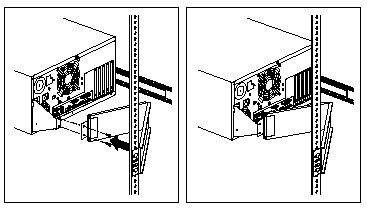
2. Attach the inner slide section of each slide rail to the side of the server.
a. Pull the inner slide until the safety latch locks.
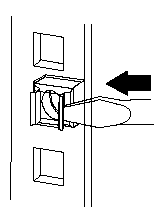
b. Press the safety latch; then, pull the inner slide firmly until it detaches from the outer slide rail.
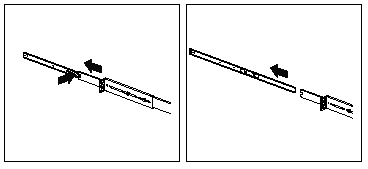
c. Align the holes on the inner slide with the holes on sides of the server; then, attach the slide with three pan-head short screws (M4 by 5 mm).
Preparing the Rack Enclosure: In this section, you will use the following parts:
- Two slide bracket assemblies
- Two slide rails (fitted to system unit)
- One cable-management arm
- Ten long screws (M6 by 16 mm)
- Ten cage nuts
- Installation template
|
Attention |
|
Note |
|
Notes |
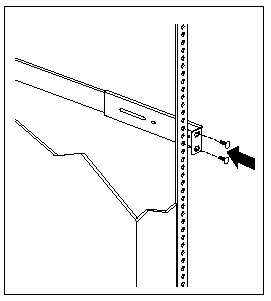
3. Attach the slide rail to the left side of the rack enclosure.
a. Extend the outer slide rail until the slide bracket is flush against the outside of the left front mounting rail. Align the slide rail with the cage nuts on the mounting rail.
b. From the front of the rack enclosure, insert two long screws through the slide bracket and mounting rail. Press the slide bracket until it is flush with the outer edge of the mounting rail; then, tighten the screws.
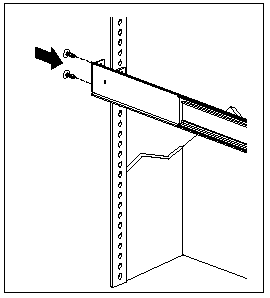
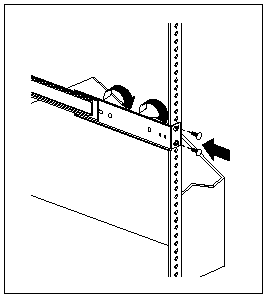
c. Attach the slide bracket to the left rear side of the rack enclosure.
1) Align the holes on the slide bracket with the cage nuts on the rear mounting rail.
2) From the rear of the rack enclosure, insert two long screws through the slide bracket and mounting rail; then, tighten the screws.
3) If it was necessary to adjust the length of the slide rails, tighten the nuts on the slide rail, using pliers, a socket wrench, or an adjustable wrench.
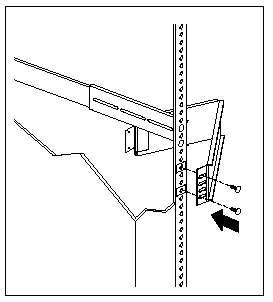
4. Attach the slide rail to the right side of the rack enclosure.
a. Extend the outer slide rail until the slide bracket is flush against the outside of the right front mounting rail. Align the slide bracket with the cage nuts on the mounting rail.
b. From the front of the rack enclosure, insert two long screws through the slide bracket and mounting rail. Press the slide rail so that it is flush with the outer edge of the mounting rail and tighten the screws.
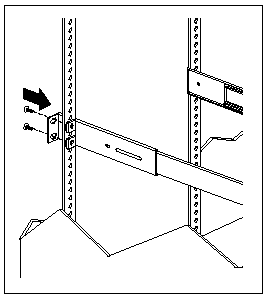
c. Attach the slide bracket to the right rear of the rack enclosure.
1) Align the holes on the bracket with the cage nuts on the rear mounting rail.
2) From the rear of the rack enclosure, insert a long screw through holes in the slide bracket and mounting rail; then, tighten the screws.
5. Attach the cable-management arm to the right rear of the rack enclosure.
a. Align the holes on the cable-management arm mounting panel with the cage nuts on the rear mounting rail.
b. From the rear of the rack enclosure, insert a long screw through the holes in the cable-management arm mounting panel and cage nut; then, tighten the screws.
|
Notes |
Installing the Server in the Rack Enclosure: In this section, you will use the following parts:
- Four long screws (M6 by 16 mm)
- Two cage nuts
- One cable-management arm
- Cable ties
To install the server into the rack enclosure:
1. If you have not done so already, install a cage nut in each front mounting rail in the marked positions, as shown.
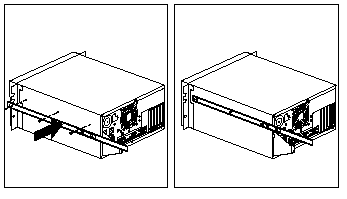
2. Position the Netfinity 5000 horizontally, with the 3.5-inch drive bays on the top.
3. Align the inner slides on the sides of the server with the slide rails; then, slide the server onto the outer slide, until the slide rails click into place.
|
Note |
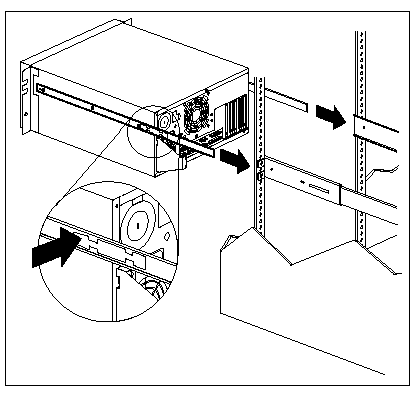
4. Press the safety latches and slide the rack model about halfway into the rack enclosure.
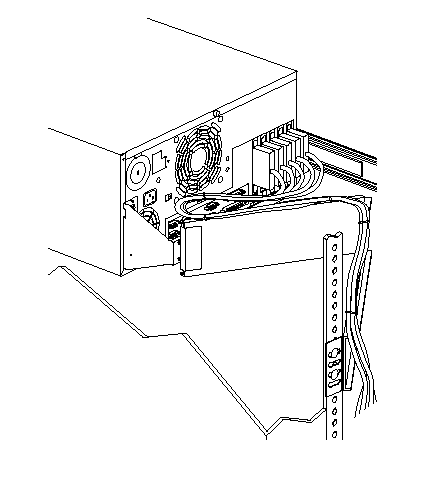
5. Attach the cable-management arm to the cable-arm bracket, using two long (M6 by 16 mm) screws.
6. If you have not done so already, attach the cable-management arm to the rack as described in steps 5a and 5b.
7. Attach the monitor, keyboard, and power cables to the corresponding connectors on the server. Refer to the rack enclosure documentation for instructions.
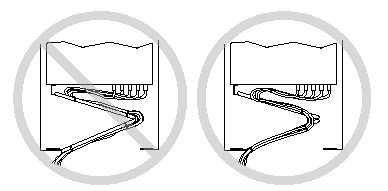
8. Attach the cables to the cable-management arm using the cable ties provided.
|
Note |
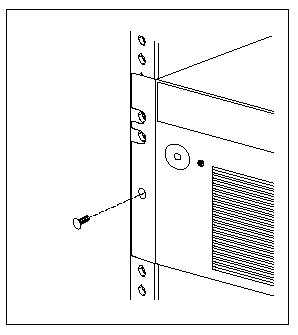
9. Secure the rack model in the rack enclosure.
a. Slide the rack model into the rack enclosure.
b. Secure the server to both sides of the rack enclosure by inserting a long screw (M6 by 16 mm) through the chassis bracket, mounting rail, and cage nut.
10. To complete the installation, refer to the documentation that comes with the rack enclosure.
|
Search Keywords |
| |
|
Hint Category |
Installation/Removal | |
|
Date Created |
24-03-99 | |
|
Last Updated |
24-03-99 | |
|
Revision Date |
24-03-2000 | |
|
Brand |
IBM PC Server | |
|
Product Family |
Netfinity 5000 | |
|
Machine Type |
8659 | |
|
Model |
| |
|
TypeModel |
| |
|
Retain Tip (if applicable) |
| |
|
Reverse Doclinks |