

|
102.743 bytes |
Service Hints & Tips |
Document ID: MCGN-3TCR36 |
|
This document is provided to IBM and our Business Partners to help sell and/or service IBM products. It is not to be distributed beyond that audience or used for any other purpose. |
Server Options - Starting the system (9306-900)
Applicable to: World-Wide
Starting the System
Start the system by:
1. Power-on the selector switch(s)
2. Power-on the monitor
3. Power-on the servers
|
Note |
Switching Among Servers
To switch among servers:
- Press the Print Screen key
- Type the port number of the server to be switched
- Press Enter
|
Note |
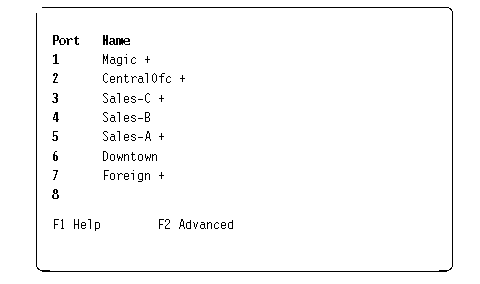
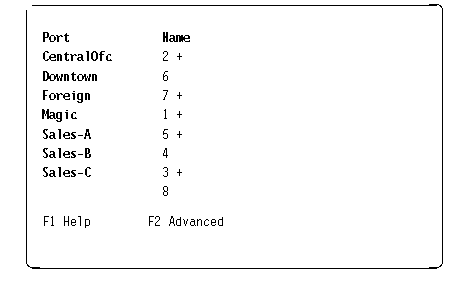
- Using the Up Arrow and Down Arrow, select the server you want to switch to, or press the numeric key that corresponds to the server's port number and then press Enter.
The symbols after the Port or Name columns on the menu show the status of the port as follows:
|
Type of Symbol |
Symbol |
Meaning |
|
Plus |
+ |
Server |
|
Asterisk |
* |
Secondary |
Scanning the Servers: To place the selector switch in scan mode:
- Press the Print Screen key
- Press the F2 key to display the Advanced Menu screen.
- Using the Up Arrow and Down Arrow keys, move the highlighting to Scan and press Enter. The selector switch enters the scan mode and the display returns to the status flag. To cancel the operation, press Esc any time before you press Enter.
- To cancel the scan mode, press any key or move the mouse. The scan stops at the currently connected server.
Displaying Version Information and Device Settings: The selector switch BIOS version number along with keyboard and mouse information can be displayed for the currently selected server.
- Press the Print Screen key
- Press the F2 key to display the Advanced Menu screen.
- Using the Up Arrow and Down Arrow keys, move the highlighting to Version and press Enter.
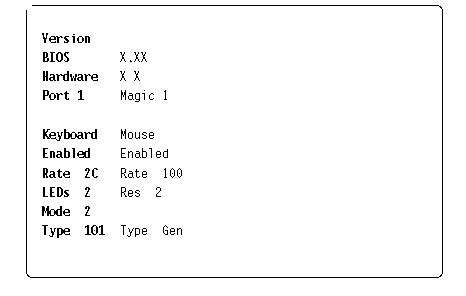
Keyboard information includes:
- Enabled or disabled
- Typematic rate
- LED settings
- Port mode
- Keyboard type.
Mouse information includes:
- Enabled or disabled
- Sample rate
- Resolution
- Mouse type
Press Esc to remove the Version menu.
Saving Hardware Configuration: Whenever servers are added to or removed from the configuration, or whenever there is a change in the mouse or monitor, save the hardware configuration setting by:
1. Press the Print Screen key
2. Press the F2 key to display the Advanced Menu screen.
3. Using the Up Arrow (¼) and Down Arrow (Ç) keys, move the highlighting to Snapshot and press the Enter key. The hardware settings are saved to memory.
|
Important |
If Name order was selected, the Port and Name columns will be reversed.
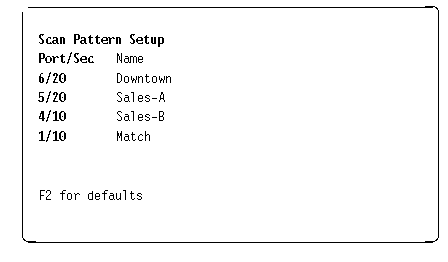
4. Using the keyboard keys, select the port number of the first server to be included in the scan. Note that the server name, if any is assigned, appears in the far right column on the menu.
5. Press the Tab key or Right Arrow key to move the highlighting to the Sec column. Then, use the keyboard keys to enter a time value, in seconds, for the length of time you want this server to be connected to the monitor and keyboard, before switching to the next server in the scan.
6. Press the Down Arrow key to move the highlighting to the next port in the Port column and repeat step 5.
To delete unwanted ports from the scan list in the Scan Pattern Setup window, place the highlighting on the top-most port to be removed and press the Delete key (not the Del key on the numeric keypad).
7. When you have finished setting the scan pattern, press the Enter key. Press Esc at any time before pressing Enter to retain the previous scan pattern.
|
Note |
8. To exit, press Esc
Assigning Unique Names to Servers: Unique names can be given to servers and secondary selector switches. To assign names:
1. Press the Print Screen key
2. Press the F2 key to display the Advanced Menu screen. Press the Right Arrow key to move the highlight to the Setup Menu.
3. Using the Up Arrow and Down Arrow keys, move the highlighting to Names and press the Enter key. The Port Naming menu appears, as shown below.
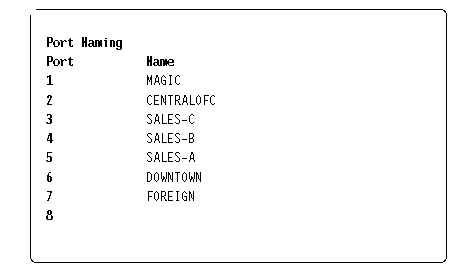
4. Move the highlighting to the Port entry for which the server name is to be entered or changed. Type in the name of the server using up to 12 alphanumeric characters.
|
Note |
Changing Menu Attributes: The menus displayed on the monitor can be altered in visual appearance to suit the particular use of the system. You can:
- Position the menu in a convenient location on the display.
- List servers by port or by name, whichever is desired, in the appropriate menus.
- Adjust character height.
- Change colors.
- Display the selection menu for a certain period.
To change the menu attributes, do the following:
- Press the Print Screen key
- Press the F2 key to display the Advanced Menu screen. Press the Right Arrow key to move the highlighting to the Setup list.
- Using the Up Arrow and Down Arrow keys, move the highlighting to OSCAR (On Screen Configuration and Activity Reporting) and press the Enter key. The following Attribute menu appears.
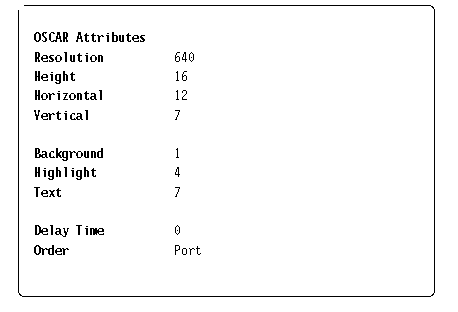
- Highlight the settings you want to change and use the + or N keys to change the values. As you select different values, the effect of the changes is reflected immediately on the display.
- When all changes are completed, press the Enter key to save the changes to nonvolatile RAM. Press Esc at any time before pressing Enter to cancel the operation and retain the previous settings.
|
Note |
|
Setting |
Effect on Menu or Window Appearance |
|
Resolution |
Affects the size of the menu and windows as they appear |
|
Height |
Affects the size of the text in the menu and windows. The |
|
Horizontal/Vertical |
Determines the position of the menu or window on the |
|
Background |
Determines the menu or window background color. |
|
Highlight |
Determines the menu or window highlight bar color. |
|
Text |
Determines the menu or window text color. |
|
Delay Time |
Sets the time in seconds that the OSCAR selection |
|
Order |
Determines the order which the servers are listed, numerically by port or alphabetically by assigned name. |
Changing the Status Flag Attributes: The status flag shows the currently connected server and can be set to appear on the screen whenever the system is operating. You can alter how and where the flag appears on the screen by changing one or more of the following attributes:
- Appearance on the screen: none, timed, or constant
- Position on the screen
- Color and opaqueness
To change the flag attributes, do the following:
1. Press the Print Screen key
2. Press the F2 key to display the Advanced Menu screen. Press the Right Arrow key to move the highlighting to the Setup menu.
3. Using the Up Arrow and Down Arrow keys, move the highlight to Flag and press the Enter key. The following menu appears.
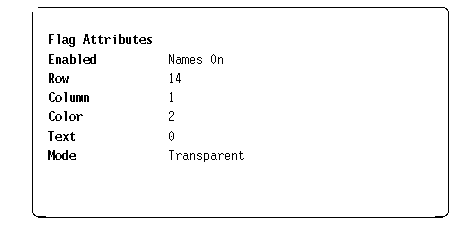
4. Highlight the setting to be changed and use the + and N keys to adjust the values. The following table describes each of the available menu attributes:
|
Setting |
Values and Effect on Flag Appearance |
|
Enabled |
Flags Off = Flag does not appear |
|
Row |
Select values from 0-14 to position the flag vertically on the screen |
|
Column |
Select values from 0-25 to position the flag horizontally on the screen |
|
Color |
Select values from 0-7 for the flag color. |
|
Text |
Select values from 0-7 for the flag text color |
|
Mode |
Choose between Opaque and Transparent |
|
Note |
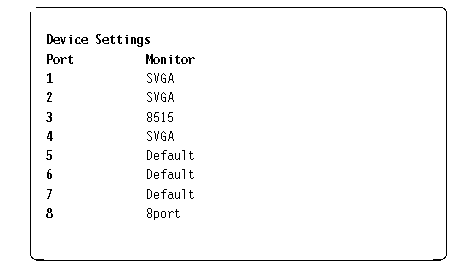
4. To assign a monitor type, highlight the port you want and use the + or - keys to select the value that corresponds to the particular monitor.
To assign a secondary selector switch to a port, highlight the port and use the + or - keys to obtain the appropriate 8port value.
5. Press the Enter key to save the settings. Press Esc at any time before pressing Enter to cancel the operation.
6. Press Esc to remove the Advanced Menu from the screen.
Resetting the Selector Switch
The selector switch can be reset by depressing the Reset button on the back panel of the selector switch.
|
Note |
|
Note |
|
Search Keywords |
| |
|
Hint Category |
Hardware Maintenance Information | |
|
Date Created |
08-04-98 | |
|
Last Updated |
27-04-98 | |
|
Revision Date |
24-04-99 | |
|
Brand |
IBM PC Server | |
|
Product Family |
Rack/Storage Enclosures | |
|
Machine Type |
9306 | |
|
Model |
900 | |
|
TypeModel |
| |
|
Retain Tip (if applicable) |
| |
|
Reverse Doclinks |