
|
23.795 bytes |
Service Hints & Tips |
Document ID: RJJR-3NBMF8 |
TP 560X - Read This First
Applicable to: World-Wide
The following information is intended for IBM Dealers and Authorized Servicers only. Customers attempting to follow any of the procedures below may void their warranty.
Read This First:
Before you go to the checkout guide, be sure to read this section.
Important Notes:
Only certified trained personnel should service the computer.
Read FRU service procedures before replacing any FRUs.
Be extremely careful during write operations such as copying, saving, or formatting. Drives in the computer that you are servicing might have been rearranged or the drive startup sequence might have been altered. If you select an incorrect drive, data or programs can be written over.
Replace FRUs only for the correct model. When you replace the FRU, make sure the model of the machine and FRU part number are correct by referring to the part list.
FRUs should not be replaced because of a single, un-reproducible failure. Single failures can occur from a variety of reasons that have nothing to do with a hardware defect such as: cosmic radiation, electrostatic discharge, or software errors. FRU replacement should only be considered when a recurring problem exists. If this is suspected, clear the error log and run the test again. Do not replace any FRUs if log errors do not reappear.
Be careful not to replace a non-defective FRU.
How to Use Error Messages:
Use the error codes displayed on the screen to diagnose failures. If more than one error code is displayed, begin the diagnosis with the first error code. The cause of the first error code can result in false error codes being displayed. If no error code is displayed, see if the error symptom is listed in the Symptom-to-FRU Index.
Port Replicator Problems:
If you suspect a problem with the Port Replicator, see Port Replicator Checkout.
How to Diagnose Multiple FRUs:
When the adapter or device has more than one FRU, the error code could be caused by either FRU. Before replacing multiple FRUs, try removing or exchanging each FRU, one by one in the designated sequence, to see if the symptoms change.
What to Do First:
The servicer must include the following in the parts exchange form or parts return form that is attached to the returned FRU.
1. Name and phone number of servicer.
2. Date of service.
3. Date when part failed.
4. Date of purchase.
5. Failure symptoms, error codes appearing on display, and beep symptoms.
6. Procedure index and page number in which failing FRU was detected.
7. Failing FRU name and part number.
8. Machine type, model number, and serial number.
9. Customer's name and address.
Before checking problems with the computer, determine whether or not the damage applies the warranty by referring to the following:
Warranty Note:
During the warranty period, the customer may be responsible for repair costs if the computer damage was caused by misuse, accident, modification, unsuitable physical or operating environment, or improper maintenance by the customer.
The following list provides some common items that are not covered under warranty and some symptoms that may indicate the system was subjected to stresses beyond normal use:
LCD panel cracked by applying excessive force or by being dropped.
Scratched (cosmetic) parts.
Cracked or broken plastic parts, broken latches, broken pins, or broken connectors caused by excessive force.
Damage caused by liquid spilled into the system.
Damage caused by improperly inserting a PCMCIA card or installation of an incompatible card.
Damage caused by foreign material in the FDD.
Diskette drive damage caused by pressing the diskette drive cover or inserting diskettes with multiple labels.
Damaged or bent diskette eject button.
Fuses blown by attaching a non-supported device.
Forgotten computer password, making computer unusable.
If the following symptoms are present, they may indicate damage caused by non-warranted activity:
Missing parts may be a symptom of unauthorized service or modification.
HDD spindles can become noisy if subjected to excessive force or by being dropped.
I9990303 errors can be caused by exposure to strong magnetic fields.
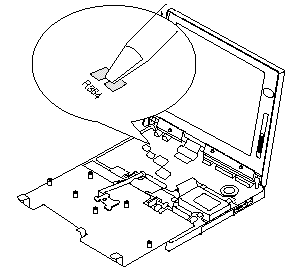
How to Disable the Power-On Password:
1. Power off the computer.
2. Remove the frame (see 1040 Frame).
3. Position the keyboard as shown in the figure.
4. Jumper the two password jumper pads located on the system board.

5. Power on the computer to clear the password.
6. Replace the keyboard and the frame.
Note:
When replacing the frame, make sure the frame fits correctly in place. If not, the click buttons of the TrackPoint III cannot be pressed. (See the note in 1050 Keyboard Unit.)
7. Replace the screws.
8. Power on the computer and wait until the POST ends.
9. Verify that the password prompt does not appear.
To reactivate the password, set the password again.
Power Shutdown Switch:
The power shutdown switch resets the system regardless of the microcode status and forces the power off. Use this push button to power-off when power is not completely off or the microcode is in a hung state.
See Bottom View for the power shutdown switch.
|
Search Keywords |
| |
|
Hint Category |
General Information | |
|
Date Created |
26-02-97 | |
|
Last Updated |
19-08-98 | |
|
Revision Date |
17-08-99 | |
|
Brand |
IBM ThinkPad | |
|
Product Family |
ThinkPad 560X | |
|
Machine Type |
2640 | |
|
Model |
Various | |
|
TypeModel |
| |
|
Retain Tip (if applicable) |
| |
|
Reverse Doclinks |