
|
81.498 bytes |
Service Hints & Tips |
Document ID: MNOK-3SWRFQ |
Aptiva - How to remove and reseat Crystal Audio adapter
Applicable to: World-Wide
Note: This procedure involves removing the system's external case. In order to protect your computer equipment from damage due to Electro-Static Discharge (ESD), be sure to disconnect the power cables from the rear of the computer, and to ground yourself by periodically touching the metal frame of the computer.
1. Shut down the system, and power the machine off. Remove the power cord and then open the case (you will need to remove the two screws behind the handle on the top of the case before you can slide it off).
2. Before proceeding further, ground yourself by touching the metal frame of the computer. This will prevent any damage to the system components due to ESD. You should repeat this grounding process each time you walk away from the system, and periodically while working inside the system.
3. Locate the Crystal Audio sound card in the system. The adapter has two cables connected to it, but they will not need to be removed for this procedure (in Sxx systems access to these cables will be obstructed by the modem adapter). Remove the retaining screw from the rear bracket of the sound card (see Figure 1), and then pull the card straight back out of its slot. Take care not to damage the cables that are still attached to the sound card as you remove it.
4. Repeat this procedure for the modem and any other adapter cards installed in the system. Each adapter card is normally secured to the system by one retaining screw in the rear bracket. This screw will need to be removed from each adapter before that card that is being taken out of the system.
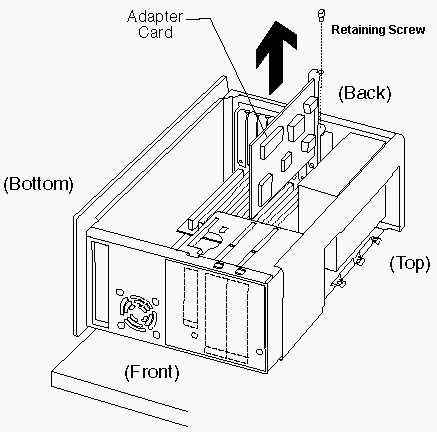
Figure 1: Removing adapter cards from mini-tower case
5. Remove each of the adapter cards and lay them carefully aside. If you need to disconnect any cables from the adapters, be sure to make a note of where they connect to the cards so you can reconnect them later.
6. You should now have clear access to the riser card. Remove the riser card retaining screw (located at the bottom of the card), and the riser card clip (depending on the release date of your system this clip may or may not be present. There is a tab on the clip that must be pinched when removing or replacing the clip.), and then pull the riser straight back out of its slot (see Figure 2).
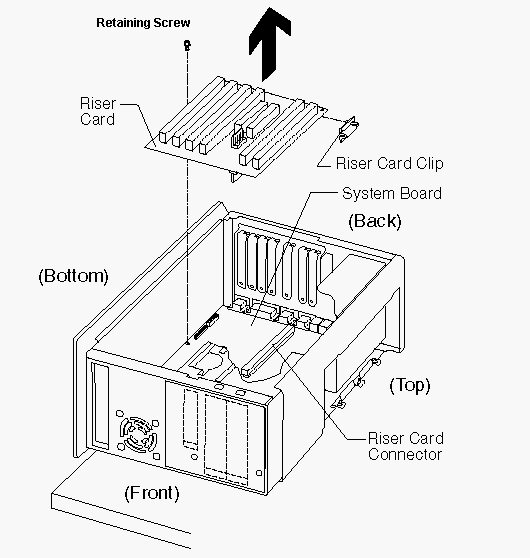
Figure 2: Removing the riser card from mini-tower case
7. Push the riser card back into its slot, and replace the card clip (if present) and screw. Make sure the screw is sufficiently tight, and that the riser is pushed all the way into the slot.
8. Replace the Crystal Audio card, the modem, and any other adapters that were in the system. Make sure that each card is pushed completely into its slot, and that the retaining screws are replaced and tightened. Be sure to reconnect any cables that you removed earlier.
9. Slide the case back onto the system unit and replace the screws. Reconnect the power cables; you are ready to power the system back on.
|
Search Keywords |
| |
|
Hint Category |
Adapter Cards, Audio, Hardware Installation/Configuration | |
|
Date Created |
25-03-98 | |
|
Last Updated |
03-12-98 | |
|
Revision Date |
02-12-99 | |
|
Brand |
IBM Aptiva | |
|
Product Family |
Aptiva | |
|
Machine Type |
2159, 2161, 2162 | |
|
Model |
S80; S90; 17R; 18R; 21R; 22R; 24R; 25R; 38R; 460; 461; 462; 471; C3D; C3E; C85; C8E; C8F; C8H; C8M; C8X; C9E; C9F; C9S; C9X; D34; D64; D84; E34 E64; E84; F34; F64; F84; G66; G76; H66; H76; J66; J76; L81; L91; M81; M91; N63; N64; N74; N81; N91; T71; T81; T84; T85; T8B; T8C; T8E; T8F; T94; T95; T9D; T9E; TAE; TAF; 28R; 29R; 30R; 31R; 33R; 35R; 37R; 41R; 54S; 56S; 57S; 58S; B86; B87; B97; D81; D91; E81; E91; G86; G96; G97; H86; H96; P81; P91; Q3C; Q81; Q91; S35; S3C; S8C; S8H; S9C; S9H; S9M; SIB; U81; U91; V86; V96; X8C; X9D | |
|
TypeModel |
| |
|
Retain Tip (if applicable) |
| |
|
Reverse Doclinks |