
|
34.310 bytes |
Service Hints & Tips |
Document ID: GSMH-3E8J9G |
PCServer330 - Changing the Write Policy
Applicable to: World-Wide
Changing the Write Policy:
When you configure a logical drive, the RAID adapter automatically sets the write policy to write-through (WT) mode, where the completion status is sent after the data is written to the hard disk drive. Under certain workloads, you can improve performance by changing this write policy to write-back (WB) mode, where the completion status is sent after the data is copied to adapter cache memory, but before the data is actually written to the hard disk drive.
Although you gain performance with write-back mode, it creates a greater risk of losing data due to a power failure. This is because the system gets a completion status message when the data reaches adapter cache memory, but before data is actually written to the hard disk drive.
If you change the write policy to write-back, wait at least 10 seconds after your last operation before you power-off the server. It takes that long for the system to move the data from the adapter cache memory to the hard disk drive. Failure to follow this practice can result in lost data.
To change the write policy:
1. Start the ServeRAID configuration program (see 'Starting the ServeRAID Configuration Program—).
2. Select Advanced Functions from the Main Menu.
3. Select Change Write Policy from the Advanced Functions menu. The cursor will be active in the Logical Drive list.
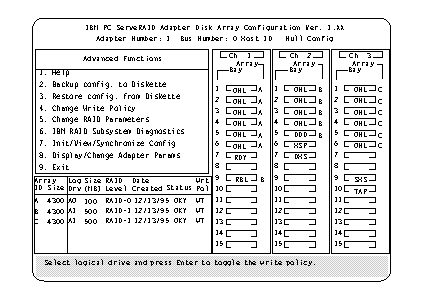
4. Select the logical drive whose write policy you want to change. A screen similar to the following appears:
|
Note: |
The Logical Drive list contains the logical drive ID, the size in megabytes of each logical drive, the RAID level you assigned to that logical drive, and the date you created it.
The status of the logical drive is also shown. OKY means that no problem conditions are associated with the drive; CRT means that you must replace the hard disk drive and rebuild the logical drive. (You will have received a message telling you what has happened to the drive.) OFL means that the logical drive is unrecoverable; the data in that drive is lost.
5. Locate the Wrt pol (Write Policy) field in the Logical Drive list.
The write policy is shown as either WT (write-through, which is the default setting) or WB (write-back).
6. Select the logical drive whose write policy you want to change.
|
Attention: |
7. Press Enter to change the write policy.
Notice that WT changes to WB. You can press Enter to alternate between WT and WB.
8. When you have made your choice, press Esc to return to the Advanced Functions menu.
9. Select Exit. The Confirm pop-up window appears asking you to confirm your action.
10. To return the setting to its original state, select No. To save your changes, select Yes.
11. Back up the disk-array configuration information to diskette. See 'Backing Up The Disk-Array Configuration— for more information.
|
Search Keywords |
| |
|
Hint Category |
Hard Drives, Hardware Maintenance Information | |
|
Date Created |
12-02-97 | |
|
Last Updated |
22-01-99 | |
|
Revision Date |
28-04-99 | |
|
Brand |
IBM PC Server | |
|
Product Family |
PC Server 330 | |
|
Machine Type |
8640 | |
|
Model |
| |
|
TypeModel |
| |
|
Retain Tip (if applicable) |
N/A | |
|
Reverse Doclinks |