
|
133.587 bytes |
Service Hints & Tips |
Document ID: MNOK-3ZXSEN |
Aptiva - 2136 Removals and replacements - Indicator LED and Cable
Applicable to: World-Wide
- Push in on the indicator LED and remove from the rear.
- Disconnect the LED and cable from the system board.
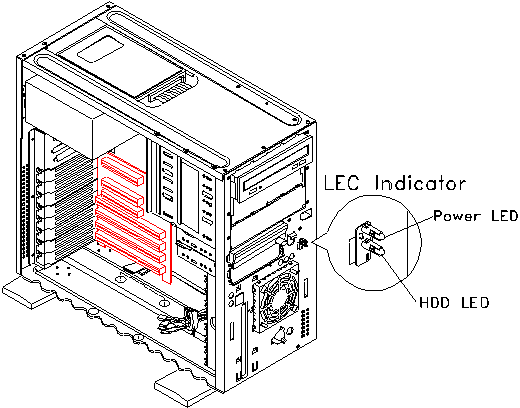
Figure 4- 24 LED Indicator
LED Cables and Power Switch Cable Install
Please follow the steps below for installation instruction and refer to the diagram.
- Insert the LED cables along with the power switch cable into the circular hole (diagram 1).
- Insert LED cables along with the power switch cable into EMI reduce core (diagram 2).
- Encircle the core with LED cables and power switch cable one full turn (diagram 3).
- Fasten the cables around the core such that the core is within 20mm from the circular hole (diagram 4).
- Fix the cables and core in place with a cable tie (diagram 5).
- Cut off surplus cable tie (diagram 6).
- Fix cables into cable clip (diagram 7).
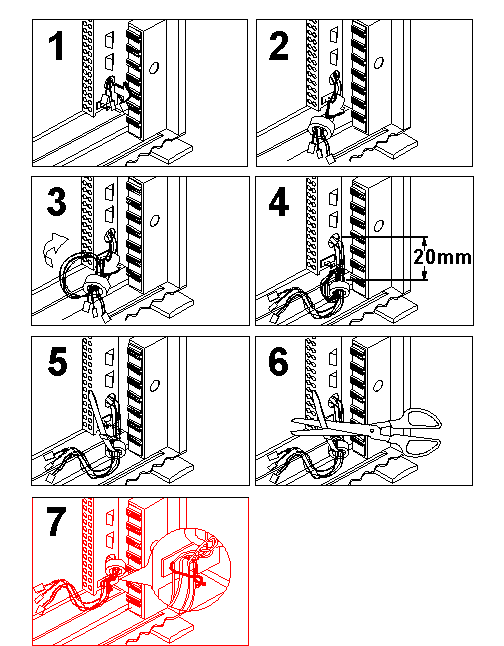
Figure 4- 25 LED Cables and Power Switch Cable Install Diagram
|
Search Keywords |
| |
|
Hint Category |
Hardware Installation/Configuration, Power, Hard Drives | |
|
Date Created |
05-11-98 | |
|
Last Updated |
08-01-99 | |
|
Revision Date |
08-01-2000 | |
|
Brand |
IBM Aptiva | |
|
Product Family |
Aptiva | |
|
Machine Type |
2136 | |
|
Model |
All | |
|
TypeModel |
| |
|
Retain Tip (if applicable) |
| |
|
Reverse Doclinks |