
|
193.277 bytes |
Service Hints & Tips |
Document ID: YAST-3JSPPH |
|
This document is provided to IBM and our Business Partners to help sell and/or service IBM products. It is not to be distributed beyond that audience or used for any other purpose. |
TP 310,315 - Diagnostic Program Disk
Applicable to: World-Wide
Follow this link to obtain the Diagnostics diskette: 
Follow this link to obtain the Maintenance Diskette:
Diagnostic Program Disk:
Diagnostic Program Disk contains the following two programs:
- PQA Diagnostic Program
- Fan Diagnostic Program
Running PQA Diagnostics Program:
Important:
Before running PQA Diagnostic Program, make sure that the write enable tab of the Diagnostic Program Disk is set to enable.
Before using PCMCIA Diagnostic in PQA Diagnostic Program, press F2 while the ThinkPad logo is being displayed after power-on to enter the BIOS Utility. Select "System Security" and set enabled for "CardBus Support" by pressing the key.
Note:
Some test items require the tools below:
FDD: Erasable 2HD diskette.
Parallel: Wrap plug (P/N: 72X8546.)
Serial: Wrap plug (P/N: 72X8546.)
PCMCIA: PC test card (P/N 35G4703.)
CD-ROM: Any data and audio CDs.
ThinkPad 310/310D Diagnostics Diskette (P/N: 12J1009.)
ThinkPad 310/310D Maintenance Utility Diskette (P/N: 12J1010.)
- Boot from the Diagnostic Program Disk and select PQA System Diagnostics Program from PC DOS 7.0 Startup Menu, the PQA main menu appears on screen.
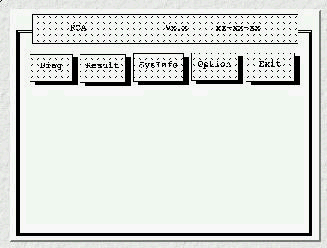
- Press --> or <-- to move around the main menu. Press Enter to enable the selected option. The main options are Diag, Result, SysInfo, Option and Exit.
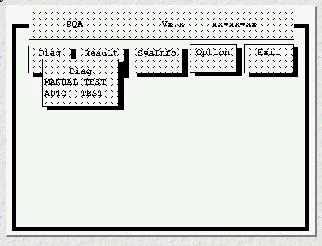
- The Diag option lets you select testing items and times.
- The following screen appears when you select Diag from the main menu. This screen allows you to specify the number of tests to perform.
The options are as follows:
- Manual Test - Performs a single test and checks the selected test items in sequence.
- Auto Test - Performs multiple tests of the selected items and checks the selected test items in sequence.
The screen below appears if you select AUTO Test:
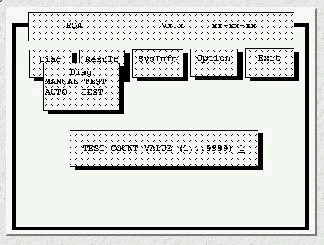
Specify the desired number of tests and press Enter. After you specify the number of tests to perform, the screen shows a list of test items (see below).
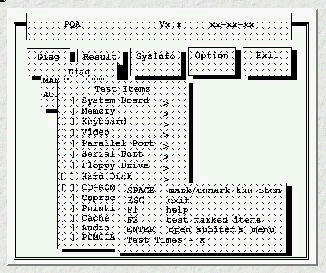
Press or to move the highlight bar from one item to another. Press Space to enable or disable the item. The mark indicates that there are available suboptions. Press Enter to view the available suboptions of each selected item. Press ESC to close the submenu.
The right corner screen information gives you the available function keys and the specified test number.
- Space: Enables/disables the item
- Esc: Exits the program
- F1: Help
- F2: Tests the selected item(s)
- Enter: Opens the available suboptions
- Test Times: Indicates the number of tests to perform.
Note:
The F1 and F2 keys function only after you finish configuring the Test option.
|
Search Keywords |
| |
|
Hint Category |
Hardware Maintenance Information | |
|
Date Created |
08-07-97 | |
|
Last Updated |
12-01-99 | |
|
Revision Date |
12-01-2000 | |
|
Brand |
IBM ThinkPad | |
|
Product Family |
ThinkPad 310, ThinkPad 315 | |
|
Machine Type |
2600 | |
|
Model |
Various | |
|
TypeModel |
| |
|
Retain Tip (if applicable) |
| |
|
Reverse Doclinks |