
|
49.338 bytes |
Parts Information |
Document ID: DDSE-42CS9B |
Netfinity 3000 - Installing or Removing ISA and PCI Adapters
Applicable to: World-Wide
Installing or Removing ISA and PCI Adapters:
This section gives the procedure for installing an ISA or PCI adapter. If you want to remove an ISA or PCI adapter, reverse the order of the following steps. If you need to install an AGP adapter in the dedicated AGP slot connector, go to "Installing or Removing AGP Adapters".
|
Notes |
|
Notes |
To install an ISA or PCI adapter:
1. Review the instructions that come with the adapter to determine if it must be installed in an ISA or PCI expansion slot; otherwise, use any empty, bus-compatible slot.
2. Remove the server side cover (see "Disconnecting Cables and Removing the Side Cover").
3. If necessary, remove the bottom cover (see "Bottom Cover").
4. Remove the screw and bracket.
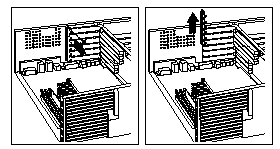
5. Remove the appropriate expansion-slot cover:
a. Remove the expansion-slot screw on the top of the expansion-slot cover.
b. Slide the expansion-slot cover out of the server.
c. Store the expansion-slot cover in a safe place for future use.

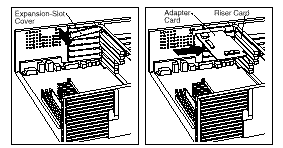
6. Touch the static-protective package that contains the adapter to any unpainted metal surface on the server; then, remove the adapter from the package.
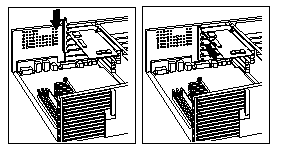
7. Install the adapter into the appropriate slot on the riser card.
You might have to remove the system board and the front fan in order to slide the adapter into the slot. See "Front Fan" and "System Board".
|
Note |

8. Install the bracket and the screw.

9. If you installed a network adapter that uses Wake on LAN or Alert on LAN, attach the cable from the riser card to the adapter. See "ISA and PCI Adapters" to locate the Wake on LAN or Alert on LAN connector. If you installed a modem and want to use Modem Wakeup, see "ISA and PCI Adapters" to locate the Modem Wakeup connector on the riser card.
10. If you removed the bottom cover, the front fan, or the system board, replace them. See "Front Fan" , "System Board" and "Bottom Cover".
11. If necessary, connect any internal cables to the adapter. Refer to the documentation that comes with the option.
12. If you installed an ISA legacy adapter, go to "ISA Legacy Resources" to assign system resources.
13. If you want to install or remove any other options, do so now. Otherwise, go to "Completing the Installation".
|
Search Keywords |
| |
|
Document Category |
Networking | |
|
Date Created |
18-11-98 | |
|
Last Updated |
24-02-99 | |
|
Revision Date |
23-02-2000 | |
|
Brand |
IBM PC Server | |
|
Product Family |
Netfinity 3000 | |
|
Machine Type |
8476 | |
|
Model |
ALL | |
|
TypeModel |
| |
|
Retain Tip (if applicable) |
| |
|
Reverse Doclinks |