
|
117.509 bytes |
Service Hints & Tips |
Document ID: MNOK-3UDSNP |
Aptiva - Setting your Windows 3.x system to record using a microphone
Applicable to: World-Wide
Connecting a microphone to an Aptiva
1. Locate the microphone. If the microphone did not come with the system, you will need to purchase a microphone with a 1/8th" stereo, phono connector.
2. Locate the "MIC" phono jack on the back of the Aptiva. ( On newer systems, the jack will be orange in color). On all other machines this is the jack closest to the edge of the computer, usually denoted by "MIC".
3. Plug the 1/8th" connector into the MIC jack.
Configuring the microphone and recording on PC DOS/Windows 3.1 - OS/2 Select-a-system preloads:
DOS/Win 3.1 Systems
1. Boot into Window 3.1
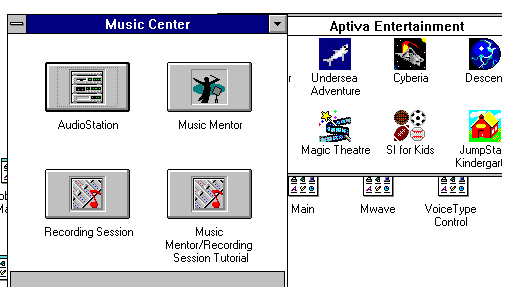
2. Double click on the "Aptiva Entertainment" Icon.
3. Double click on the "Music Center" Icon.
4. Click on the Audiostation button.
5. Make sure the audio mixer is showing on the screen. If it is not, click on the button directly beside the question mark at the center of the top of the window.

6. If you wish to use the microphone for recording, click on the box to the left of the word "Record". The button should turn red.

7. Now click on the button that says "MIC". the green light should illuminate when this is done correctly. Make sure the "M" beneath the "Input" levers is black with grey background. If it is grey with a black background, the Input is muted.
8. Now locate the .wav player within audio station. (If it is not on screen click on the cassette icon on the power bar.) Click on the red button on the .wav player. The light on the button will begin flashing.
9. Click on the Play button (denoted by the single arrow pointing to the right) and begin speaking into the microphone. Adjust the volume lever marked "Input" to desired level.

OS/2 Systems
1. Boot into OS/2.
2. Double click on the "Aptiva Entertainment" Icon.
3. Double click on the "Music Center" Icon.
4. Click on the "Audiostation" button.
5. Make sure the audio mixer is showing on the screen. If it is not, click on the button directly beside the question mark at the center of the top of the window.
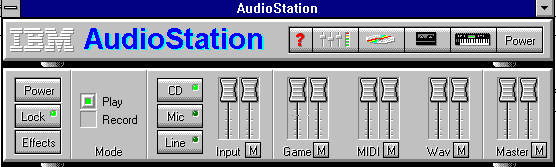
6. If you wish to use the microphone for recording, click on the box to the left of the word "Record".
7. Now click on the button that says "MIC". The green light should illuminate when this is done correctly. Make sure the "M" beneath the "Input" levers is black with grey background. If it is grey with a black background, the Input is muted.
8. Now locate the .wav player within audio station. (If it is not on screen click on the cassette icon on the power bar.) Click on the red button on the .wav player. The light on the button will begin flashing.
9. Click on the Play button (denoted by the single arrow pointing to the right) and begin speaking into the microphone. Adjust the volume lever marked "Input" to desired level.

|
Search Keywords |
| |
|
Hint Category |
Audio | |
|
Date Created |
11-05-98 | |
|
Last Updated |
13-05-98 | |
|
Revision Date |
12-05-99 | |
|
Brand |
IBM Aptiva | |
|
Product Family |
Aptiva | |
|
Machine Type |
2144, 2168 | |
|
Model |
2R5; 2R7; 2R8; M30; M35; M50; 2R6; 4R7; 4R8; M40; M54; M58; M60; M70 | |
|
TypeModel |
| |
|
Retain Tip (if applicable) |
| |
|
Reverse Doclinks |