
|
101.697 bytes |
Service Hints & Tips |
Document ID: GSMH-3DAFD6 |
TP Dock I - Related Service Procedure
Applicable to: World-Wide
Related Service Procedures:
This section provides related service information on the following:
|
'Status Indicators— |
|
'Checking the Installed Devices List— |
|
'Security— |
|
'How to Run the Diagnostics— |
|
'SCSI Diagnostics (Dock I)— |
|
'Selecting a SCSI Device Test— |
Important:
When the Problem Determination Procedure in the operation manual that is supplied with the adapter or device says 'Have the system unit serviced,— this means the computer and the Dock I.
Status Indicators:

Checking the Installed Devices List:
The HDD-1 or FDD-1 represents the first drive in the system configuration, respectively. Similarly, the HDD-2 or FDD-2 represents the second drive, usually attached through a Dock I.
Notes:
1. Neither the Dock I nor the adapters and SCSI devices installed in the Dock I appear as icons on the screen.
2. HDD-1 and HDD-2 icons are for the 2.5-inch ThinkPad hard disk drive. If the devices are installed, but the icon appears in a gray shade rather than a dark shade on the basic diagnostic screen, it means that the devices are defective. Power-off the computer and make sure that the devices are correctly connected. If the symptom still remains after the computer is powered-on, replace the devices or the main board of the Dock I.
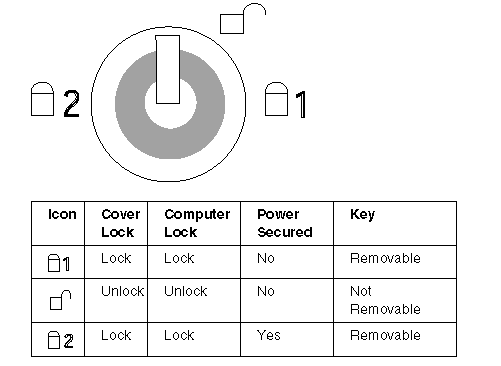
Security:
The Dock I has two features to secure it from being used by unauthorized persons.
Security Lock:
The security lock is located on the left side of the Dock I front panel, and can be unlocked with the security lock key. This security lock provides the following protection:
- Cover Lock prevents unauthorized access to the devices and options inside the Dock I.
- Computer Lock protects from unauthorized removal of the computer.
Key Controlled Power prevents unauthorized use of the Dock I or unauthorized access to the data stored on the internal SCSI device through the external SCSI connector by securing the power.
The key lock has three positions.
Security Hook:
The hook for a security chain or cable is located on the rear of the Dock I. The diameter of the hook is 4 mm (0.15 in.) or less.
Attach a chain or similar item through the hook and secure the Dock I to a desk or similar stable item.
How to Run the Diagnostics:
Use either the TrackPoint II or the cursor move keys to interact with the tests. The Enter key works the same as selecting the OK icon to reply OK.
1. Press and hold F1, then power-on the computer. Hold F1 until the Easy-setup screen appears.
2. Select Test and press Enter. The basic diagnostic screen appears.
3. Select a device and press Enter to run the test.
4. The test progress screen appears.
5. OK appears when the test ends without any errors.
Advanced Diagnostic Tests:
1. Go to the advanced diagnostic screen by pressing Ctrl+A on the basic diagnostic screen.
2. Select Tool to install the tools.
3. Select a device, press the spacebar, and install the tool. Multiple devices can be selected by repeating this step. A | mark appears for the selected device.
4. Select OK and press Enter if the selection is OK.
5. Select a device and press Enter to start the tests.
How to Run All Tests:
In the advanced diagnostic screen, select Test All to test all devices.
How to Run the Loop Test:
1. Go to the advanced diagnostic screen by pressing Ctrl+A on the basic diagnostic screen.
2. Select the Looptest icon and press Enter or click the click button.
3. Select a device and press the spacebar.A| mark appears for the selected device.
4. If the selection is OK, select OK and press Enter to start the loop test.
5. To exit the loop test, press and hold Ctrl+ Pause until the interrupt is accepted by the test program. A beep sounds when the interrupt is accepted. The test loop stops at the end of the current test.
How to Run the Keyboard Test:
1. Power-off the computer.
2. Remove the external keyboard, if one is attached.
3. Press and hold F1 key, then power-on the computer. Hold F1 until the Easy-Setup screen appears.
4. Select Test and press Enter. The basic diagnostic screen appears.
5. Press Ctrl+A to go to advanced diagnostic screen.
6. Press Ctrl+K. A keyboard picture appears on the screen.
7. By pressing a key, the mark appears or disappears on the corresponding key position on the screen. Repeat this step for any keys that need to be tested.
8. To exit the test, press Esc or select the cancel icon.
How to Run the Audio Test:
1. Power-off the computer.
2. Insert the maintenance diskette into diskette driveA and power-on power.
3. Select the Audio Diagnostics from the main menu.
4. Select Tests from the menu bar and press Enter.
5. Select All tests from the pull-down menu and press Enter.
Run options are set to test once and stop on error as defaults. Other options can be selected by the pull-down menu of Setting-up.
6. Follow the instructions that appear on the screen to proceed with the tests.
7. If the tests end without detecting any error, the 'All tests passed OK— message appears.
8. If an error is detected, the FRU code and error description message appear. Go to 'FRU Codes— on page 14 and replace the FRU.
9. To exit the test screen, press Esc.
Notes:
a. If an instruction to plug the external loop cable appears, connect it between the microphone/line jack of the computer and the headphone jack of the Dock I.
b. If an instruction to plug the headphone appears, connect it to the headphone jack of the Dock I.
c. Volume Control Test does not work when the computer is docked to the Dock I.
PC Test Card LED:
The green LED on the PC test card lights when the PCMCIA test is running. If the LED does not go on, check that the card is installed correctly by reseating the card. If it still does not light after reseating, try using another slot for the test. If the LED still does not go on and the test fails, replace the FRU shown in the diagnostic error code.
Diagnostic Error Indications:
If an error is detected, the following appears:
- Large X on the left-side of the device icon.
- Device ID (three digits).
- Error code (two digits).
- FRU code (four digits).
The FRU code represents two FRUs. The leftmost two digits indicates the higher priority of replacement. The device ID and error codes are used to indicate the detail portion of the FRU which caused the error.
Errors During the POST:
If the POST detects an error, a three- to eight-digit error code is displayed.
Memory Errors:
If the POST detects a memory error in the first 640KB of system memory, all of the first 2MB of memory is de-allocated and the test continues with the second 640KB of the second 2MB of memory. If the total amount of error free memory becomes less than 2MB, a 2XX POST error occurs and the system stops. All of the 20MB (maximum) memory is used as system memory. The memory write and read test proceeds through the IC DRAM memory. When the POST memory test has completed, the usable memory size is compared with the configuration data and if a mismatch is detected, a 2XX error code occurs. The user can continue with system operation by pressing F1 and call for service at a later time.
The memory sizes that are de-allocated because of the POST process is kept by the hibernation or suspend functions. To test this memory, it must be re-configured as part of the original memory size. The memory re-configuring is done by turning power-off and on. De-allocation support is done only by the POST for memory errors. All unrecoverable memory errors that occur during normal operation cause an interrupt to the operating system.
Error Log:
Diagnostic errors are printed on the printer that is attached to parallel port when the error is detected. The error is also logged in the system memory.
Use the following procedure to display the errors.
1. End the test, if it is running.
2. Press Ctrl+A to select the advanced diagnostic mode.
3. Press Ctrl+E.
4. The error log appears.
5. To exit the screen, select the cancel icon or press Esc.
The error log is not saved when system power is turned off.
SCSI Diagnostics (Dock I):
The SCSI diagnostics help you troubleshoot SCSI adapter and device problems through a series of menus. The diagnostics are provided on the Dock I Option Diskette.
Some SCSI devices might be shipped with diagnostics However, you must use the option diskette shipped with Dock I to test the SCSI controller and SCSI devices.
Notes:
1. In the diagnostics, the built-in SCSI controller is regarded as an adapter. If the diagnostics detect any adapter problems, replace the main board of the Dock I.
2. If the SCSI devices are not connected to the Dock I, the built-in SCSI controller is disabled. You cannot run the SCSI diagnostics.
The procedures in Figure 1 summarizes the major steps.
- Start the utility program.
- Select the SCSI adapter to be scanned.
- Select the SCSI device to be tested.
- Select a test option from the SCSI fixed/removal drive menu.
The options are:
- Adapter Diagnostics
- Send Device Diagnostics
- Test Unit Ready
- Read Test - Read/Write Test (if you have a fixed disk drive)
- Low-Level-Format Drive.
Figure 1. SCSI Diagnostics Utility Program Procedure
After SCSI Installation
Run the diagnostics after you have completed your SCSI device installation to verify that the installation works correctly. Do the following:
1. Power-off the computer and external SCSI devices. Insert the Dock I Option Diskette into drive A.
2. Power-on all attached external SCSI devices, then power-on the computer.
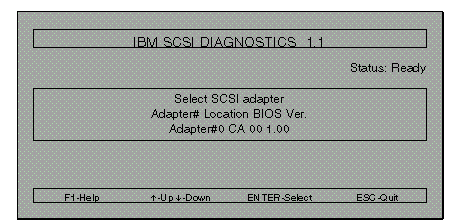
3. In the main menu, select Diagnostics , then select Test SCSI subsystem.
4. The following screen appears.
Note:
In this screen, SCSI controller of the Dock I, appears as Adapter 0.
Figure 2. Select SCSI Adapter Screen
Note:
If the following screen appears instead of the one in Figure 2, check that the SCSI devices are correctly installed. If the problem still occurs, the main board has a failure. Ignore the actions in this screen message.
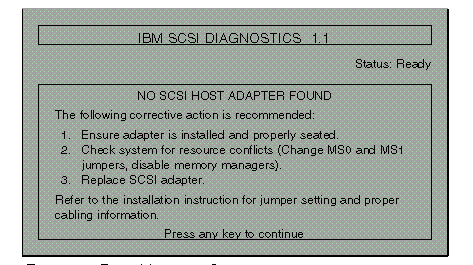
Figure 3. Error Message Screen
5. Press Enter.
6. After the following message appears:
SCANNING SCSI BUS FOR DEVICES
The screen changes to:
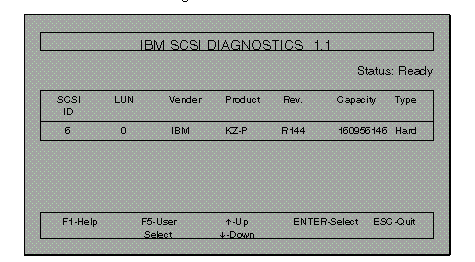
Continue with the following.
Selecting a SCSI Device Test:
The first SCSI device in the list with the lowest SCSI ID is highlighted.
1. Select the device to test with the cursor and press Enter.
Adapter Diagnostics:
Three pass/fail tests are run on the built-in SCSI controller to check Read Only Memory (ROM), Random Access Memory (RAM), and the SCSI data bus.
Device diagnostics:
This function issues the Device Diagnostic command to the selected device. If the device is a removable media, you are instructed to insert the media. If the command completes successfully, the selected devices are installed and are functioning correctly.
Test Unit Ready:
This command is issued to each device to check that the device is online and ready to accept commands.
Get Device Status:
If an error occurs in the Test Unit Ready, Read, or Read/Write tests, run żGet Device Status— to isolate the failure problem causing the error.
Read Test:
This test issues Read commands to read all data from the beginning to the end of the drive to verify that the drive reads the data correctly.
Read/Write Test:
This test issues Write commands, then reads the data back and compares the write and read data to verify that the drive is operating correctly. This test destroys all data test on the drive.
Low-Level Format Drive:
This test performs a low-level format; all existing data is destroyed. It is not necessary to run this test unless your SCSI drive was used previously in another configuration. This test does not have to be run on a new drive.
2. To select a test option, type the number in the Enter Selection field and press Enter.
|
Search Keywords |
| |
|
Hint Category |
Hardware Maintenance Information | |
|
Date Created |
13-01-97 | |
|
Last Updated |
27-08-98 | |
|
Revision Date |
21-08-99 | |
|
Brand |
IBM ThinkPad | |
|
Product Family |
ThinkPad Docking Stations | |
|
Machine Type |
3545 | |
|
Model |
001 | |
|
TypeModel |
| |
|
Retain Tip (if applicable) |
N/A | |
|
Reverse Doclinks |