
|
169.961 bytes |
Service Hints & Tips |
Document ID: GSMH-3DKEA7 |
TP Selectadock II - How To Run The Diagnostics
Applicable to: World-Wide
How to Run the Diagnostics:
This section describes how to run the diagnostics for both the computer and the SelectaDock Docking System.
Diagnostics for ThinkPad:
Use either the TrackPoint III or the cursor move keys to interact with the tests. The Enter key works the same as selecting the OK icon to reply OK.
1. Press and hold F1; then power-on the computer. Hold F1 down until the Easy-Setup screen appears.
2. Select Test and press Enter.
3. Selecta device and press Enter to run the test.
4. The test progress screen appears.
5. OK appears when the test ends without any errors.
6. Start the Advanced Diagnostic test by pressing Ctrl+A on the basic diagnostic menu screen.
7. Select Tool to install the tools.
8. Selecta device and press the Spacebar and install the tool. You can select multiple devices by repeating this step. A | mark appears beside the selected devices.
9. Select OK and press Enter if the selection is OK.
10. Select a device and press Enter to start the tests.
11. Select Test All to test all devices.
12. Select Loop Test to run the tests in a repeated loop.
A loop option menu appears in which a device loop or all-device loop can be selected. Select a device and press the Spacebar to select a device. Repeat this step to select multiple devices. Press Enter to start the diagnostic loop. If no device is selected, all device tests are looped.
13. To exit the loop, keep pressing Ctrl+ Pause until the test exits. A beep sounds to notify that the exit interrupt is sensed by the test program.
Error Log:
Diagnostic errors are printed on a printer that is attached to the parallel port when the error is detected. The error is also logged in the system memory.
Use the following procedure to display the errors:
1. End the test, if it is running.
2. Press Ctrl+A to select the advanced diagnostic mode.
3. Press Ctrl+E.
4. The error log appears.
5. To exit the screen, select the cancel icon or press Esc.
The error log is not saved when the system is powered off.
How to Run the Keyboard Test:
Use the following procedure to run the keyboard key test.
1. Power-off the computer.
2. Remove the external keyboard, if one is attached.
3. Press and hold F1, then power-on the computer. Hold F1 until the Easy-Setup screen appears.
4. Select Test and press Enter. The basic diagnostic screen appears.
5. Press Ctrl+A to go to the advanced diagnostic screen.
6. Press Ctrl+K.A keyboard picture appears on the screen.
7. When you pressa key,a mark appears or disappears on the corresponding key position on the screen.
Repeat this step for any keys that need to be tested.
8. To exit the test, press Esc or select the cancel icon.
PC Test Card LED:
The green LED on the PC test card lights when the PCMCIA test is running. If the LED does not light, check that the card is installed correctly by reseating the card. If it still does not light after reseating, try using another slot for the test. If the LED still does not light and the test fails, replace the FRU shown in the diagnostic error code.
Errors during the POST:
If the POST detects an error, a three- to eight-digit error code displays.
Memory Errors:
If the POST detects a memory error in the first 640 KB of system memory, all the first bank memory is deallocated and the test continues with the second 640 KB of memory. If the total amount of error-free memory becomes less than 2 MB, a 2XX POST error occurs and the system stops. All the remaining memory is used as system memory. When the POST memory test has completed, the usable memory size is compared with the configuration data. If a mismatch is detected, a 2XX error code occurs. Press Esc , and F1 after restart to continue system operation.
Memory sizes, that are deallocated because of the POST process, are kept by the hibernation or suspend functions. To test this memory, it must be reconfigured as part of the original memory size. Configure by turning the power off and on.
Deallocation support is done only by the POST for memory errors. All irrecoverable memory errors that occur during normal operation cause an interrupt to the operating system.
Diagnostics for the SelectaDock Docking System:
The SelectaDock Docking System Options Diskette helps you troubleshoot the expansion unit, SCSI adapter, and SCSI device problems through a series of menus.
Run the diagnostics to verify operation of the SelectaDock Docking System and SCSI devices.
Do the following:
1. Power-off the computer on the SelectaDock Docking System and external SCSI devices.
2. Insert the Option Diskette into drive A.
3. Power-on all attached external SCSI devices and the computer on the SelectaDock Docking System.
4. The Logo Screen appears.
5. Aftera few seconds the Main Menu appears.
6. Selecta device for testing and go to the respective section.
Testing the Expansion Unit:
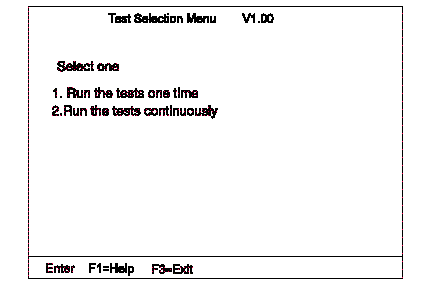
1. The Test Selection Menu appears when you select Test Expansion Unit on the Main Menu.
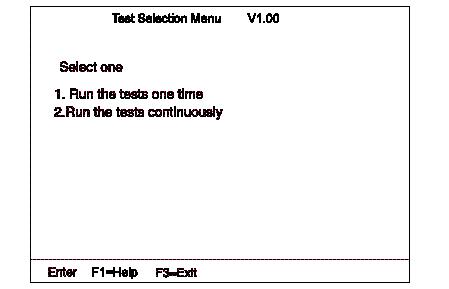
2. Select an item on the screen and follow the instructions that appear on the screen.
Testing the SCSI Subsystem:
Note:
If a SCSI adapter is installed in an PCI adapter card slot, remove it before running the SCSI diagnostic program.
1. When you select Test SCSI Subsystem on the Main Menu, the diagnostics program checks the system configuration for SCSI devices and displays the following if no SCSI controller is found.
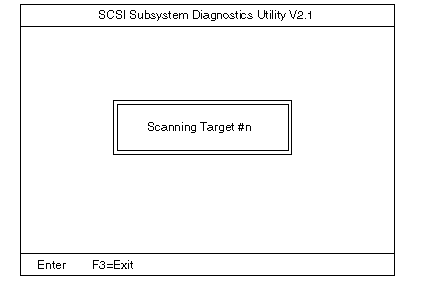
If a SCSI controller is found, the computer goes on to initialize the SCSI devices and displays the following:
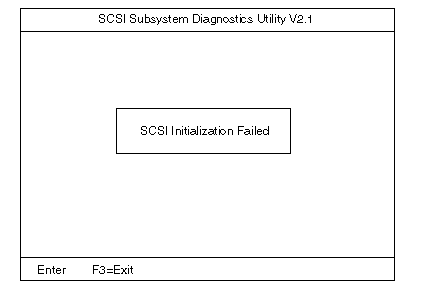
2. If the initialization fails, the following screen appears:
If the initialization ends successfully, the following screen appears. Select an item.
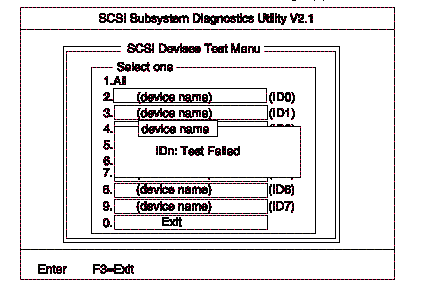
3. The SCSI Devices Test Menu appears. Select one of the devices.
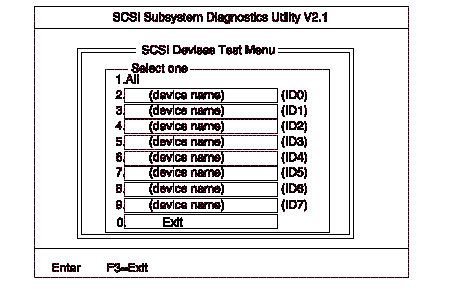
The device name may be any of the following:
SCSI hard disk
SCSI tape drive
SCSI CD-ROM
SCSI optical drive
No device
The SCSI controller of SelectaDock Docking System appears as ID7 on the screen.
4. If a SCSI device exists anda test medium is required to test the SCSI device, the following pop-up menu appears (shows the case of a SCSI tape drive).
5. Insert the requested medium and wait approximately 30 seconds until the medium is loaded.
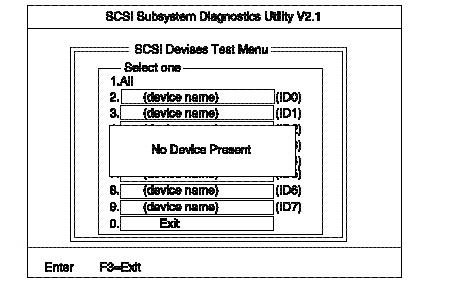
6. Press any key. If no SCSI devices are found,a pop-up menu appears.
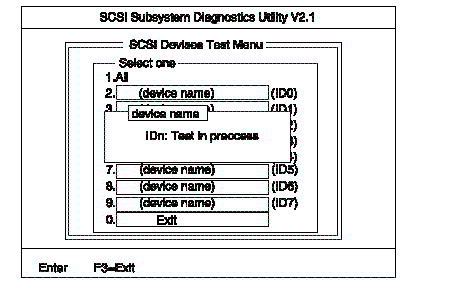
7. The test begins and the following pop-up menu appears:
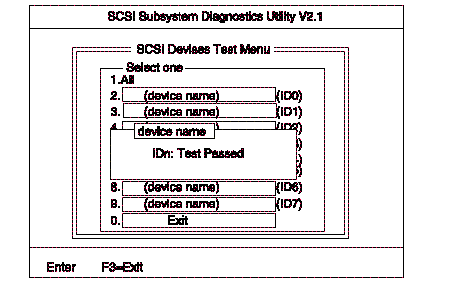
8. If the test is successful, the following appears:
If the test is unsuccessful, the following appears:
|
Search Keywords |
| |
|
Hint Category |
Hardware Maintenance Information | |
|
Date Created |
22-01-97 | |
|
Last Updated |
27-08-98 | |
|
Revision Date |
21-08-99 | |
|
Brand |
IBM ThinkPad | |
|
Product Family |
ThinkPad Docking Stations | |
|
Machine Type |
3547 | |
|
Model |
002 | |
|
TypeModel |
| |
|
Retain Tip (if applicable) |
N/A | |
|
Reverse Doclinks |