
|
76.103 bytes |
Service Hints & Tips |
Document ID: MNOK-3T5THK |
Aptiva - How to reseat diskette drive cables
Applicable to: World-Wide
For systems with no media console:
1. Locate the data and power cables on the back of the diskette drive. The data cable is a wide ribbon cable with a red stripe on one side (the red stripe is used to ensure the proper orientation of the cable). It connects the diskette drive to the motherboard. The power cable consists of several individual wires leading from the power supply to one connector plugged into the drive.
2. Grasping the connectors firmly, remove both cables from the back of the diskette drive and replace them in their original locations, making sure to maintain the correct orientation.
For 2159 and 2162 systems:
The media console is not considered user-serviceable. However, the end-user can remove and reseat the media console cable at the tower and the media console host card inside the tower. It is recommended to replace the media console or to take the system to an IBM servicer for diskette drive service.
For 2142 systems:

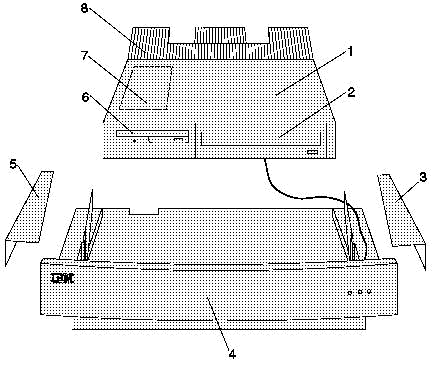
Media Console Assembly, Type 2142:
1. Media Console Top Cover & Console Assembly
2. CD-ROM or DVD-ROM Drive
3. Right Wing Cover
4. Media Console Base
5. Left Wing Cover
6. 3.5-in. 1.44 MB Diskette Drive
7. Client Card including On/Off switch (internal)
8. Media Console Rear Cover
1. With system turned off, remove the Media Console Rear-Cover (#8) by pushing down on cover with both thumbs and pushing cover to the rear.
2. Remove the Right and Left Wing Covers (#3 & 5) by pulling covers away from the side of the case.
3. Lift the Console Assembly straight up from the front and then pull it out of the hinge assembly. In order to gain access to the cable connectors in the Media Console Base (4), set the Console Assembly back down, slightly toward the front of the Media Console Base.
4. Squeeze the two end clips inward on the ribbon cables to the Floppy drive and pull the cable connections upward to remove. It helps to alternate pulling on each side of the connector until it is removed.
5. Remove the two white power connector cables at the center. There is a clip on the back of each socket that holds the connector. If you place your thumbnail or similar tool in from the top and pull slightly to the rear, it will release the clip so that the connector may be pulled out with your other hand.
6. Reseat the ribbon cables and the white power cables into their respective sockets on the Media Console Base. Ensure all the cables are seated securely and properly oriented.
7. Close Media Console Assembly.
8. Slide the Wing Covers from back to front into their slots. Slide the Rear Cover from back to front into its slots to complete the assembly process.
|
Search Keywords |
| |
|
Hint Category |
Diskette Drives, Diagnostics, Hardware Installation/Configuration | |
|
Date Created |
01-04-98 | |
|
Last Updated |
03-12-98 | |
|
Revision Date |
02-12-99 | |
|
Brand |
IBM Aptiva | |
|
Product Family |
Aptiva | |
|
Machine Type |
2134, 2136, 2137, 2138, 2140, 2142, 2144, 2159, 2161, 2162, 2168, 2176 | |
|
Model |
all | |
|
TypeModel |
| |
|
Retain Tip (if applicable) |
| |
|
Reverse Doclinks |