
|
114.527 bytes |
Parts Information |
Document ID: MCGN-44LS2P |
ServeRAID 3H - Configuration Overview
Applicable to: World-Wide
Configuration Overview
The IBM ServeRAID Configuration Utility programs enable viewing of the current disk array configuration, the changing or deletion of existing arrays, the creation and initialization of new disk arrays, and the performance of many other configuration and maintenance tasks.
It is necessary to use a ServeRAID Configuration Utility program to configure your disk array before partitioning hard disk drives and installing an operating system. You can use the DOS Configuration Program, the GUI-Based Configuration Program, and the ServeRAID Administration and Monitoring Utility. After configuring the disk arrays and installing the operating system, return to this manual for information about installing and using the ServeRAID Administration and Monitoring Utility programs.
Using the ServeRAID DOS Configuration Program
To start the ServeRAID Configuration Utility program:
1. Insert the IBM ServeRAID Configuration Diskette into the primary diskette drive and turn on the system. If the system is already turned on, shut down and restart the system.
Each time the system starts, the ServeRAID 3H Adapter performs a power-on self-test (POST). The POST checks the configuration information for the ServeRAID 3H Adapter and for the configured hard disk drives.
a. If POST does not detect changes in the adapter configuration or any adapter hardware problems, continue with step b.
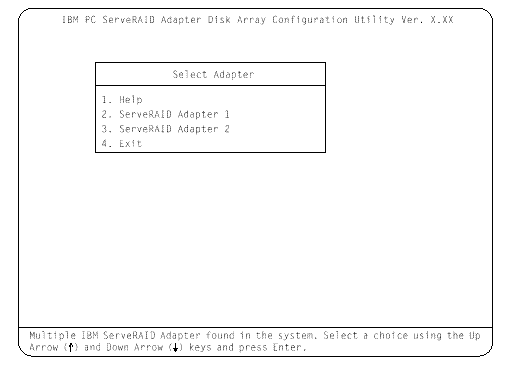
b. If you have multiple ServeRAID adapters installed in your system, you will see a screen with multiple adapters. The screen may not look exactly like this one.

|
Note |

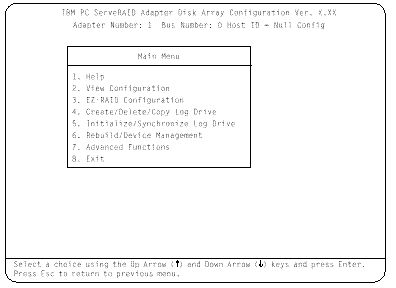
4. To choose an option from the Main Menu, type the highlighted number of the menu item, or use the Up Arrow key or Down Arrow key to highlight your choice; then, press Enter. You also can press Esc to return to the previous menu, the previous work area of a screen, or to the beginning of the Main Menu.
To restore or convert disk array information when you upgrade from an IBM ServeRAID Adapter or an IBM Streaming Adapter to an IBM Netfinity ServeRAID 3H Ultra2 Adapter/Controller:
1. From the Main Menu, select Advanced Functions.
2. Select Restore/Convert Saved Config.
|
Note |
To change write policies of logical drives:
1. From the Main Menu, select Advanced Functions.
2. Select Logical Drive Params Management.
This option lets you enable the NVRAM (Battery-Backup Cache) write cache feature if the Non-Volatile Write Cache Feature Card is installed on your ServeRAID adapter.
The Change Write Policy command configures a local drive in an array to work in either write-through mode or write-back mode. In write-through mode, completion status is sent after the data is written to the drives. In write-back mode, completion status is sent before the data is actually written to the drives. The write-back mode usually provides higher performance, but with increased risk of data loss in the event of a power failure.
When you enable write-back mode, you enable the NVRAM (Battery-Backup Cache) write cache feature for a logical drive, which provides a backup of the data being written to a logical drive in the NVRAM (Battery-Backup Cache) cache on the Non-Volatile Write Cache Feature card.
To "fine tune" the ServeRAID 3H subsystem for optimal performance:
1. From the Main Menu, select Advanced Functions.
2. Select Change ServeRAID Parameters.
You can control the following parameters:
|
Note |
To set a basic configuration:
1. From the Main Menu, select Advanced Functions.
2. Select Init/View/Synchronize Config.
When you choose Initialize Configuration:
The ServeRAID 3H Adapter/Controller stores its ServeRAID configuration in its NVRAM (Battery-Backup Cache), FLASH (EEPROM), and on all physical hard disk drives that are part of a logical drive. An option is provided to view the configuration from all of these sources.
You may also choose a source (hard disk drive, FLASH, NVRAM (Battery-Backup Cache)) from which to synchronize the ServeRAID configuration. For example, you may do this when a new ServeRAID adapter/controller is used to replace a defective one. We recommend using the hard drive, since it refreshes information in the buffers about the drive firmware levels.
The ServeRAID 3H Adapter/Controller also maintains a list of all changes to its ServeRAID configuration. A power-on change list, wrong SCSI ID list, and an unidentified drive list are updated when devices are added or moved.
Changes to the states of the devices also change this list. An option is provided to view all of this information.
To display the ServeRAID 3H Adapter/Controller status or to write a new adapter configuration Host ID:
1. From the Main Menu, select Advanced Functions.
2. Select Display/Change Adapter Params.
You can also change the ServeRAID 3H Adapter/Controller SCSI channel ID and speed.
To define or delete a merge group ID for a shared or non-shared logical drive:
1. From the Main Menu, select Advanced Functions.
2. Select Merge Group Management.
Merge group IDs are valid only in a High Availability environment. A High Availability environment is a setup in which two servers have access to the same physical disk drives via a shared SCSI bus. The ServeRAID configuration is set up in such a way as to allow the operational server to assume the logical drives of the failing server. This minimizes the downtime to clients of the failed server.
Create Shared Logical Drive ID enables you to define a merge group ID for a logical drive. The logical drive's physical disk(s) are assumed to be shared by another server via the SCSI bus. The merge group ID must be in the range of 1-8. Merge group IDs 1-4 are allocated for use on one of the servers in the cluster and IDs 5-8 are to be allocated for the other partner server.
Create Non-Shared Logical Drive ID enables you to create a merge group ID for non-shared logical drives. The merge group ID must be in the range of 200-215.
Delete Logical Drive Merge ID enables you to delete shared and non-shared merge group IDs.
Merge/Unmerge Logical Drive enables you to merge/unmerge partner logical drives. It also lets you merge/unmerge a host system's own shared logical drives. You may also merge/unmerge a host system's own non-shared logical drives.
|
Note |
Using the ServeRAID GUI-Based Configuration CD
To start the configuration program:
1. Insert the ServeRAID GUI-Based CD into the CD-ROM drive; then, turn on the server.
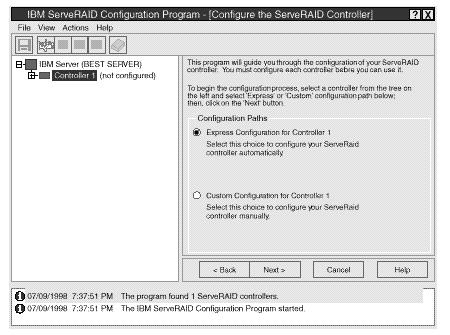
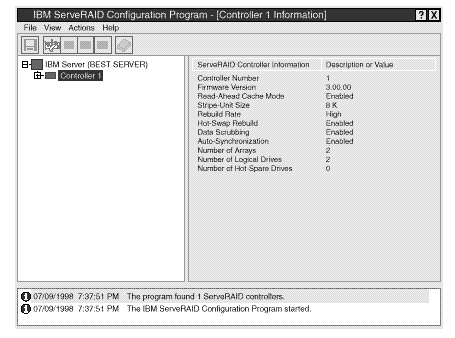
One of the following screens will appear:

Select the Cancel button to switch from the Configuration mode to the Information mode.

Select the  icon on the Tool Bar to switch from the Information mode to the Configuration mode.
2. Change Write-Cache Mode to Write-Through or Write-Back: This choice is available in the Information mode when you select a specific logical drive icon from the Main Tree.
When this feature is set to the write-through mode, the completion status of a write command is sent after the data is written to the hard disk drive. Under certain workloads, you can improve performance by changing this setting to the write-back mode, where the completion status of a write command is sent after the data is copied to cache memory, but before the data is actually written to the storage device.
|
Attention |
3. Disable or Enable Read-Ahead Cache Mode: This choice is available in the Information mode only. When read-ahead cache is set to Enabled (default setting), the ServeRAID controller transfers data from a disk to its local cache in increments equal to the stripe unit size. This provides excellent overall performance when workloads are steady and
sequential. However, if the workload is random or the system I/O requests are smaller than the stripe unit size, reading ahead to the end of the stripe might degrade performance. When read-ahead cache is set to Disabled, the ServeRAID controller transfers data from a disk to local cache in increments equal to the system I/O request size, without reading ahead to the end of the stripe.
4. Change the Rebuild Rate: This choice is available in the Information mode only. You can select this choice to set the priority for Rebuild operations to High (default), Medium, or Low.
|
Search Keywords |
| |
|
Document Category |
Controllers | |
|
Date Created |
29-01-99 | |
|
Last Updated |
15-03-99 | |
|
Revision Date |
15-03-2000 | |
|
Brand |
IBM PC Server | |
|
Product Family |
ServeRAID | |
|
Machine Type |
Various | |
|
Model |
| |
|
TypeModel |
| |
|
Retain Tip (if applicable) |
| |
|
Reverse Doclinks |