
|
33.084 bytes |
Service Hints & Tips |
Document ID: DETR-42RPAC |
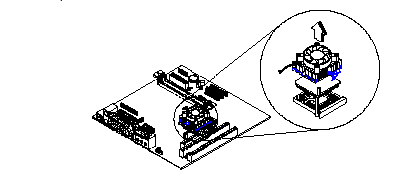
Aptiva - 2158 Removals and replacements - Processor
Applicable to: World-Wide
NOTE: Determine the type of processor you are installing and make sure the jumpers are set correctly. Run the Setup Utility after correctly installing a processor.
CAUTION: Processors are sensitive to static discharge.
NOTE: Installing the processor

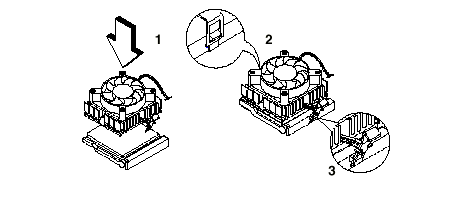
4. Place the processor heat sink fan over the processor.
5. Insert one side of fan brace onto the ZIF socket
6. Secure by latching the other side to the ZIF socket.
7. Reconnect the processor fan sink cable to the connector FN1 on the system board.
|
Search Keywords |
| |
|
Hint Category |
Processors, Hardware Installation/Configuration | |
|
Date Created |
01-12-98 | |
|
Last Updated |
02-03-99 | |
|
Revision Date |
01-03-2000 | |
|
Brand |
IBM Aptiva | |
|
Product Family |
Aptiva | |
|
Machine Type |
2158 | |
|
Model |
all | |
|
TypeModel |
| |
|
Retain Tip (if applicable) |
| |
|
Reverse Doclinks |