
|
98.374 bytes |
Product Information |
Document ID: DDSE-44JLL9 |
Netfinity 7000 - Setup Program
Applicable to: World-Wide
The Setup program stores configuration values in nonvolatile random-access memory (NVRAM) and in the battery-backed memory of the real-time clock. Entries that you make in the System Configuration Utility program overwrite the entries made in the Setup program.
You perform much of the system configuration through the System Configuration Utility program, not the Setup program.
In most cases, the server operates using the default settings, and you need to change the settings only to resolve configuration conflicts or to enable or change device function.
Review the information that comes with the device before making changes. Also, record the current settings before making any changes.
The Setup program consists of the following menu bar selections:
Main: Select this choice to set the System Time and Date. This menu also allows you to view or change configuration settings for the CD-ROM drive and diskette drive.
Advanced: Select this choice to view the settings of integrated peripherals and to identify the type and speed of the microprocessors.
Security: Select this choice to set passwords. Press F1 for online Help information while in the Setup program.
Starting the Setup Program: To access the Setup program:
1. Power-on the server and watch the screen.
2. The system prompts you to Press <F1> if you want to run SETUP. As soon as you see that prompt, press F1.
When POST completes, you will enter Setup.
|
Note |
Changing Settings: To view or change the settings:
1. Use the Up Arrow or Down Arrow key to advance through the items on the screen. Press Enter to select an item.
2. Follow the instructions on the screen to view or change the configuration. You must correctly exit from the Setup program to save the configuration information.
3. Press F10 to save the configuration values and exit from the Setup program.
4. Press Enter to confirm.
Printing and Restoring CMOS Default Settings: If a printer is attached to the server, you can use the Print Screen key to print the configuration settings. You can restore default settings by using the Setup program.
To restore default settings:
1. Power-on the server.
2. Press F1 to enter the Setup program.
3. Press F5 to restore the default configuration values.
4. Press F10 to save the configuration values and exit from the Setup program.
5. Press Enter to confirm.
Disabling the Diskette Drive and CD-ROM Drive: After configuring the system, it can be secured against casual or unauthorized access by running the Setup program to disable the diskette drive and CD-ROM drive.
To disable the diskette drive using the Setup program:
1. Power-on the server.
2. Press F1 to enter the Setup program.
3. Select Floppy Options.
4. Select the drives that you want to disable.
5. Press F10 to save the configuration values and exit from the Setup program.
6. Press Enter to confirm.
To disable the CD-ROM drive using the Setup program:
1. Power-on the server.
2. Press F1 to enter the Setup program.
3. Select Primary IDE Master.
4. Select IDE Device Configuration.
5. Select Disable.
6. Press F10 to save the configuration values and exit from the Setup program.
7. Press Enter to confirm.
Defining the Startup Device: The default initial startup device is the CD-ROM drive. After configuring the system, you can define the startup sequence to meet specific processing needs.
To define the startup sequence:
1. Turn on the server.
2. Press F1 to enter the Setup program.
3. Select Boot Options.
4. Select the startup sequence.
5. Press F10 to save the configuration values and exit from the Setup program.
6. Press Enter to confirm.
System Configuration Utility Program
The System Configuration Utility program provides a convenient method to configure various system settings. This program automatically configures system adapters and maintains system parameters. Because the System Configuration Utility program assigns system resources, conflicts between adapters are less likely to occur.
If a conflict does occur, see "Configuration Conflicts".
You must use the System Configuration Utility program anytime you want to change resource allocations, such as:
- Adding, deleting, or moving ISA or EISA devices
- Resolving conflicts
- Maintaining security functions
The System Configuration Utility program automatically configures PCI devices, Plug and Play devices, and system memory.
Each time that you use the System Configuration Utility program to configure your server, the configuration information is saved to the nonvolatile random-access memory (NVRAM) and in a backup file (with an extension of .CMS). Only devices that you install and configure correctly appear on the System Configuration Utility program screens.
Before making changes, review this section and the information included with the devices you are adding. Also, record the current settings (see "Recording the System Configuration Utility Program Settings") before making any changes. The values that you enter using the System Configuration Utility program override the entries in the Setup program.
In most cases, the server will operate using the default settings, and you need to change the settings only to resolve configuration conflicts or to enable or change device function (for example, define the drive startup sequence).
Starting the System Configuration Utility Program: To access the System Configuration Utility program:
1. Insert the System CD-ROM into the CD-ROM drive.
2. Turn on the system. Or, if the system is turned on, press Ctrl+Alt+Del.
The system begins the power-on self-test (POST). If you have set a user password, the system prompts you to enter it.
Notes:
a. If a user password is set, you must enter it to access the System Configuration Utility program. If you have set user and administrator passwords, you can enter either one. If you have set an administrator password, you must enter the administrator password to change and save configuration data.
b. If a configuration error occurs, a prompt appears before the operating system starts (see "Configuration Conflicts").
3. Select Run System Configuration Utility from the Startup Menu.
4. Press Enter when the system configuration utility title screen appears.
A screen similar to the following appears when you start the system configuration utility program.

Defining Configuration Settings: The following information explains the menu selections.
Utilities: Press F9 from the Main Menu screen to access the Utilities screen. The Utilities choice controls some aspects of how the system generates configuration data. For example, the System Configuration Utility program can prompt the user to manually add boards.
Press the Spacebar to select an option. Refer to the following table for information on the choices on this menu.

Press the PF key to select one of the following options.

Step 1: About System Configuration: Select About System Configuration for an overview of the program. You can select this choice from a menu for specific information about each function.
You can also press F1 for online Help information while performing a configuration function.
Step 2: Add and Remove Boards: Select Add and Remove Boards to add, remove, or move any adapter. The System Configuration Utility program automatically detects and adds most adapters. This step provides a list of all correctly configured devices. You can press F6 to add ISA devices to the configuration.
The server requires configuration files to correctly configure ISA and EISA adapters.
|
Note |
Step 3: Change Configuration Settings: Select this choice to change the configuration, if necessary. If you change a setting in this step, you might need to change a switch or jumper setting on the system board or on a device.
All settings will remain in the default position if you do not use this selection to change the configuration.
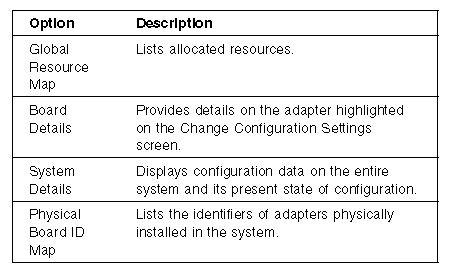
Advanced Options: Press F9 to display the Advanced Options Menu screen from the Change Configuration Settings choice. This screen provides options to display configuration data. You can select the following choices:
Step 4: Save Configuration System Configuration
Utility program configuration settings : Select this choice to save the configuration settings to nonvolatile random-access memory (NVRAM) and in a backup file (with an extension of .CMS).
Note
Be certain that you want to save this configuration data, because once you select this choice, the save process begins immediately.
If you elect to not save your changes, you can select Exit from the System Configuration Utility menu to exit from the program and maintain your existing configuration values.
Step 5: View Switch/Jumper Settings: Select View Switch/Jumper Settings to display the current settings of switches and jumpers on any adapter that has switches or jumpers.
Step 6: Exit: Select this choice when you are finished using the system configuration utility program. If you have changed configuration settings, you can optionally press F10 to restart the system so that the new settings take effect. Otherwise, press Enter to exit from the System Configuration Utility program.
Recording the System Configuration Utility Program Settings: Record the default configuration settings on a separate sheet; then, store the sheet in a safe place for future reference. If you have a printer attached to your server, you can use the Print Screen key to print these settings. The settings are helpful when you install additional options, or if the system requires service. Also, record the new settings each time you make changes.
|
Search Keywords |
| |
|
Document Category |
Configuration | |
|
Date Created |
27-01-99 | |
|
Last Updated |
27-01-99 | |
|
Revision Date |
27-01-2000 | |
|
Brand |
IBM PC Server | |
|
Product Family |
Netfinity 7000 | |
|
Machine Type |
8651 | |
|
Model |
| |
|
TypeModel |
| |
|
Retain Tip (if applicable) |
| |
|
Reverse Doclinks |