
|
23.723 bytes |
Parts Information |
Document ID: DDSE-42DRBJ |
Netfinity 5000 - Installing or Removing Drives in Bays 1 through 5 (Hard Disk Drives)
Applicable to: World-Wide
Installing or Removing Drives in Bays 1 through 5 (Hard Disk Drives): This section gives the procedure for installing a hard disk drive. If you want to remove a drive, reverse the following steps.
|
Note |
Attention: To avoid damage to a hard disk drive, do not remove the drive from the hot-swap bay until it has had time to spin down (approximately 30 seconds). Handle the drive gently.
|
Before you begin |
Your Netfinity 5000 contains hardware that lets you replace a hard disk drive without turning off the Netfinity 5000. These drives are known as hot-swappable or hot-swap drives.
Each hot-swap drive that you plan to install must have a hot-swap-drive tray attached. The drive must have a single connector attachment (SCA) connector. Hot-swap drives come with the hot-swap-drive tray attached.
|
Notes |
To install a drive in a hot-swap bay:
1. Remove the filler panel  from one of the empty hot-swap bays by inserting your finger into the depression at the top of the filler panel (tower model) or left side of the filler panel (rack model) and pulling it away from the server.
|
Attention |
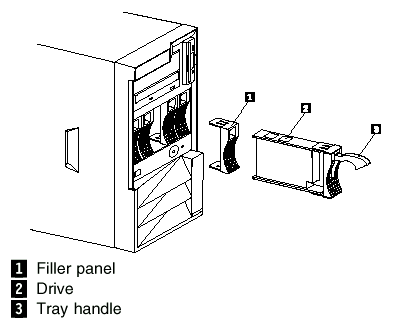
2. Install the hard disk drive  in the hot-swap bay.
a. Ensure the tray handle  is open (that is, perpendicular to the drive).
b. Align the drive-tray assembly so that it engages the guide rails in the bay.
c. Gently push the drive-tray assembly into the bay until the drive connects to the backplane.
d. Push the tray handle toward the drive until the handle locks.
3. Check the hard disk drive status indicators to verify that the hard disk drives are operating properly. See Front Panel Indicators for details.
|
Notes |
4. If you want to install or remove any other options, do so now. Otherwise, go to Completing the Installation.
|
Search Keywords |
| |
|
Document Category |
Hard Drives | |
|
Date Created |
19-11-98 | |
|
Last Updated |
19-11-98 | |
|
Revision Date |
19-11-99 | |
|
Brand |
IBM PC Server | |
|
Product Family |
Netfinity 5000 | |
|
Machine Type |
8659 | |
|
Model |
ALL | |
|
TypeModel |
| |
|
Retain Tip (if applicable) |
| |
|
Reverse Doclinks |