
|
71.261 bytes |
Product Information |
Document ID: MCGN-3ZUJJU |
Netfinity 7000 M10 - Changing Jumper Positions
Applicable to: World-Wide
Source: Hardware Maintenance Manual
Changing Jumper Positions
Jumpers located on the I/O function card and processor board help you to customize the way your server operates. Your I/O function card and processor board contain two-pin and three-pin jumper blocks. In some cases, groups of jumpers might combine to define a function.
Before you begin:
Read "Safety Information".
To change a jumper position:
1. Remove the server top cover or front access cover, depending on the location of the jumper (see "Preparing to Install Options").
2. If the jumper is located on the I/O function card, remove the I/O function card from the server:
a. Refer to the following illustration while you perform the steps in this procedure.
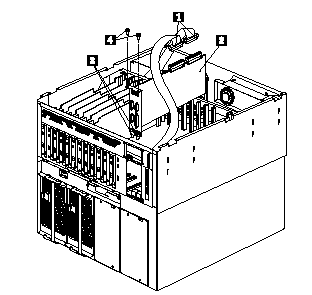
b. Disconnect the cables .1/ from the I/O function card .2/. Note carefully where each cable is connected before you remove it.
c. Remove the two screws .4/ located on the metal connector plate inside the server.
d. Carefully grasp the I/O function card by its top edge and pull the I/O function card out of the server.
e. Place the I/O function card connector-side up on a flat, static-protective surface.
3. Locate the jumper:
- To change a two-pin jumper block, go to "Two-Pin Jumper Blocks".
- To change a three-pin jumper block, go to "Three-Pin Jumper Blocks".
Two-Pin Jumper Blocks: Covering both pins with a jumper defines one function of the jumper block. To change the function of the jumper block, cover one pin only or remove the jumper entirely.
The following illustration identifies pins 1 and 2 on a two-pin jumper block.
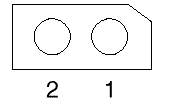
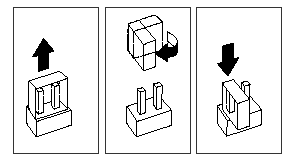
To change the jumper position on a two-pin jumper block:
1. Lift the jumper straight off the block and then do one of the following:
- Align the holes in the bottom of the jumper with the two pins on the pin block, and then slide the jumper carefully onto these pins.
- Align one of the holes in the bottom of the jumper with one of the pins on the pin block, and then slide the jumper carefully onto that pin only.
2. If you removed the I/O function card, install it:
a. Refer to the illustration in step 2a while you perform the steps in this procedure.
b. Carefully grasp the I/O function card by its top edge, and insert the tabs 3 on the bottom edge of the metal connector plate into the matching openings on the server back panel.
c. Align the I/O function card with the guide on the opposite end of the adapter and the slot on the I/O board.
d. Press the I/O function card firmly into the slot.
Attention: When you install the I/O function card in the server, be sure that it is completely and correctly seated. Incomplete insertion might cause damage to server components.
e. Insert the two screws you removed in step 2c.
f. Connect the cables you disconnected in step 2b.
3. Reinstall the server top cover or front access cover and connect the cables (see "Completing the Installation").
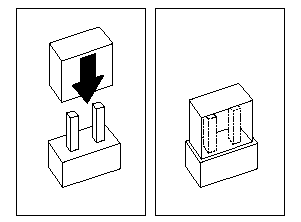
Three-Pin Jumper Blocks: With the three-pin jumper blocks, each jumper covers two of the three pins on a pin block. You can position the jumper to fit over the center pin and either of the other two pins. The following illustration identifies pins 1, 2, and 3 on a three-pin jumper block:

To change the jumper position on a three-pin jumper block:
1. Lift the jumper straight off the pin block.
2. Align the holes in the bottom of the jumper with the center pin and the pin that was not covered previously.
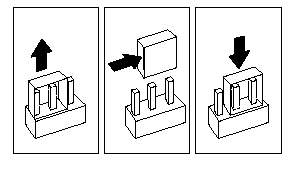
3. Slide the jumper fully onto these pins.
4. If you removed the I/O function card, install it:
a. Refer to the illustration in step 2a on page 89 while you perform the steps in this procedure.
b. Carefully grasp the I/O function card by its top edge, and insert the tabs .3/ on the bottom edge of the metal connector plate into the matching openings on the back panel.
c. Align the I/O function card with the guide on the opposite end of the adapter and the slot on the I/O board.
d. Press the I/O function card firmly into the slot.
|
Attention |
e. Insert the two screws you removed in step 2c.
f. Connect the cables you disconnected in step 2b.
5. Reinstall the server top cover or front access cover and connect the cables (see "Completing the Installation").
|
Search Keywords |
| |
|
Document Category |
Diagrams | |
|
Date Created |
02-11-98 | |
|
Last Updated |
18-01-99 | |
|
Revision Date |
18-01-2000 | |
|
Brand |
IBM PC Server | |
|
Product Family |
Netfinity 7000 M10 | |
|
Machine Type |
8680 | |
|
Model |
all | |
|
TypeModel |
| |
|
Retain Tip (if applicable) |
| |
|
Reverse Doclinks |