
|
39.390 bytes |
Service Hints & Tips |
Document ID: COBN-3G2CPV |
Aptiva - 2162 Setup Utility described
Applicable to: World-Wide
Setup Utility
The Setup Utility lets you view and change important information about the computer and its hardware.
Using the Setup Utility
You might need to use the Setup Utility in the following situations:
If you add or replace a hardware option (such as a diskette drive, hard disk drive, or memory module), and you want
to verify or make a change.
To verify a change after removing a hardware option.
If you get an error code and message.
You can also use the Setup Utility to:
Check the computer's hardware features. For example, you can use this program to check the amount of memory
or the size of the hard disk in the computer.
Change the computer's serial and parallel port settings, and the parallel port mode.
Set up or change a password on the computer.
Change the date and time on the computer.
Reduce the amount of energy the computer uses by setting up the computer's Rapid Resume features.
Determine which Plug and Play adapter cards you want configured by system BIOS.
Starting the Setup Utility
The Setup Utility displays screens that let you view information about how the computer is set up (called the configuration),
or change certain information on the computer. There are two ways to display the Setup Utility screen:
When you power the computer on, this symbol appears:

Press F1 while the symbol is displayed to get the Setup Utility screen.
If you have an error, the computer shows a popup window with an error code and description.
The Setup Utility screens display the type of information shown here. The actual screens on the computer might look
slightly different, but they operate the same way.
Here are the keys you use to move through and make changes to the Setup Utility screens.
Keys Function
½ ƒ Use these arrow keys to highlight an option.
œ Use these arrow keys to make a selection and change an option.
F1 Help. Press this key if you want more information about an option or using the screen.
F2 General Help. Press this key if you want general information about the computer features.
Page Down Press this key to see the next page (screen).
Page Up Press this key to go to the previous page (screen).
Brackets [ ] show you which options can be changed on the screen.
The * symbol on the screen shows you that an option has been changed.
Now that you know how to work with the Setup Utility screens, read on to learn about the options you can change on the screen.
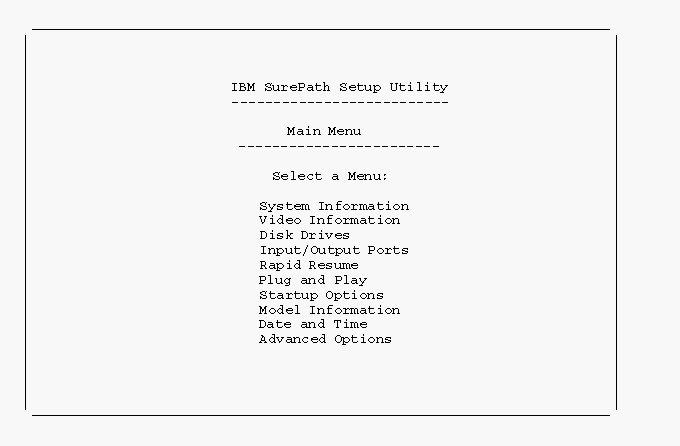
Figure 1-1. Setup Utility Screen
Making Changes with the Setup Utility
You can change only some of the information that appears on the Setup Utility screen. The information you can change
is always enclosed in brackets like this: [ Disabled ]. The entries on the screen that you cannot change provide useful
information about the computer and its hardware. For example, if the mouse is not working or installed incorrectly, the entry will show if it is disabled or not installed.
Here are the options available on the Setup Utility screens:
System Information: This screen provides a summary of the computer features. (This is an information only screen and cannot be changed.)
Video Information: This option displays the name of the video controller and the video memory installed on the system board. The system is shipped with 2 MB of video memory installed. An additional 2 MB of video memory can be installed for a maximum of 4 MB.
Disk Drives: This screen provides information about the installed diskette drives, hard disk drives, and CD-ROM installed in the computer. Hard Disk Drive 1 on this screen is the hard disk that came with the computer.
If you add or change a drive, you must select the correct drive type on this screen. If both a CD - ROM drive and a hard disk drive are installed, the jumpers on the hard disk drive must be set to master for the hard drive to appear as Drive 3 on the Setup Utility screen. The CD-ROM must be set as the slave device. It will appear as Drive 4 on the screen.
If a hard disk is the only drive attached to the secondary hard disk drive connector, it appears as Drive 3 on the Setup Utility screen. If two hard disks are attached to this connector, they appear as Drives 3 and 4 on the screen.
Input/Output Ports: This screen allows you to you change the serial and parallel port addresses. Mouse and keyboard information is also provided on this screen.
The computer has one serial port and one parallel port. Each port has a special address (identifying location) assigned to it. If you add any additional serial or parallel port adapters, make sure that each port has a different address.
The serial port default address is 2F8-IRQ3.
The parallel port default address is 3BCh.
Other serial and parallel port addresses are available. However, if you change an address on this screen, you might also need to make changes to the software. For instructions on changing the software, see the user's guide or online information supplied with the software.
The Parallel Port Mode allows you to change the mode of the parallel port. The standard mode for the parallel port is the Compatible mode. You can increase the efficiency of the parallel port by using Enhanced modes with supporting hardware.
Note: The Enhanced modes use recent technology and are only supported by newer hardware (such as a printer).
If you change the mode of the parallel port, you might need to make changes to the supported hardware and its software.
Rapid Resume: This screen provides information about the Rapid Resume features. Rapid Resume is an exclusive IBM
energy-saving feature with many useful options.
Rapid Resume can:
- Save the current state of the computer when you power it off. Any applications or programs open when the computer is powered off will be open when the computer is powered back on.
- Automatically power off the computer when you have not used the mouse, keyboard, or hard disk for an amount of time you select. If you have an energy-saving monitor, it will also power off.
- Put the computer in a Standby mode to conserve energy when you have not used the mouse, keyboard, or hard disk for an amount of time you select.
- Reduce the time the computer takes to start up.
- Automatically power-on the computer when the phone rings so that the computer can receive a fax (Wake Up on Ring).
- Automatically power-on the computer at a date and time you choose (Wake Up on Alarm).
The following are the Rapid Resume options you can change:
APM BIOS Mode: The Basic Input/Output System (BIOS) is the machine language that runs the computer.
The APM BIOS Mode option shows you the advanced power management (APM) mode that the operating system's APM driver
should use when it communicates with BIOS. For Microsoft Windows 95, APM BIOS Mode should be set to 32-Bit Protected.
Note: If you are using the OS/2 operating system, select 16-Bit Protected for the APM BIOS Mode.
Rapid Resume: This screen lets you turn Rapid Resume on ( Enabled ) or off ( Disabled ).
Note: APM BIOS must be enabled before enabling Rapid Resume.
Automatic Power Off is the option that allows you to set the amount of time that will pass before the computer powers off automatically.
For example: 30 minutes means that if the mouse, keyboard, or hard disk are not used for 30 minutes, the computer powers off automatically. Only energy-saving monitors will power off automatically with Rapid Resume.
The current state of the computer is saved before the computer powers off. Any applications or programs open when the computer powers off will be open when you power the computer back on.
Initialize Adapter Cards is the option that indicates whether the adapter cards are restarted (initialized) when you power-on the computer.
Standby Timer is the option that allows you to set the amount of time that will pass before the computer starts conserving energy.
For example: 15 minutes means that if the mouse, keyboard, and hard disk drive are not used for 15 minutes, the monitor goes blank and the hard disk drive in the computer starts using less power.
Note: Only energy-saving monitors power down during standby.
If you are using the Automatic Power Off feature, the time you set for Standby must be less than the time you set for Automatic Power Off. Otherwise, the computer will power off before it enters Standby.
Standby Snapshot is the option that allows you to have the state of the computer saved when it enters Standby.
If the electricity goes out or the computer is powered off while in Standby, the computer resumes at the saved state when you power it back on. Any applications or programs open when the computer shut down will be open when the power returns.
Monitor mode is an option might or might not appear depending on the type of processor installed in the computer. If you see this option, you can change the power mode used to blank the monitor during Standby. If you have an energy-saving monitor, the VESA DPMS setting powers the monitor back on fastest.
Note: Only energy-saving monitors will power down during Standby.
Halt CP w hen Idle is the option that allows you to halt the CPU during Standby. This conserves power without affecting the operation of the computer.
Wake Up on Ring is the option that allows you to have the computer power on automatically when the phone rings. This is useful if you have a fax modem and use the computer to receive faxes. To use this feature, you must have an internal modem that supports Wake Up on Ring, or an external modem connected to serial port A on the back of the computer.
Note: With Wake Up on Ring, the computer might power-on automatically when you dial out on a rotary or pulse telephone.
If this occurs, disable the Wake Up on Ring feature and use it only when you know you will have incoming fax communications.
Indicatoris a Wake Up on Ring feature that makes the power light blink at a constant rate to indicate that the computer answered the phone one or more times. The Indicator resets when you power the computer on.
Wake Up on Alarm is the option that allows you to have the computer power-on automatically at a date andtime you specify.
Choose the date and time in the Alarm Date and Alarm Time fields. If you select Daily Event, you can set the Alarm Time, but not the Date.
Alarm Date and Time are options that allow you to set the date and time you want the computer to power-on automatically.
Enter the date in the format shown on the screen.
Type the time in 24-hour format. For example:
12 midnight is 00:00
12 noon is 12:00
1 p.m. is 13:00
Plug and Play: This screen provides information about the Plug and Play features. The screen includes the Auto Configure
Cards option, and a list of all Plug and Play adapter cards installed in the computer.
Auto Configure Cards is an option that allows you the choice of:
All Plug and Play adapter cards configured by system BIOS
Only Plug and Play adapter cards required to boot the system configured by system BIOS
If you have a Plug and Play operating system, the computer might function better if only the Plug and Play adapter cards required to boot the system are configured by system BIOS. If you choose to have only the adapter cards required to boot the system configured by system BIOS, use the operating system~s Plug and Play utilities to configure the other Plug and Play cards.
Plug and Play Adapter Cards is the option that lists all the Plug and Play cards you have installed in the system unit.
Note: Only the newest operating systems support Plug and Play adapter cards. See the documentation supplied with the operating system to determine if it supports Plug and Play adapter cards.
Startup Options: This screen provides information about the computer power-on (startup) sequence. When you power the computer on, it looks for the operating system files. Use the Startup Sequence option to tell the computer where to look for these files. The computer can search for these files on a diskette, an adapter card, a network, or a hard disk.
The system's startup sequence automatically looks for the operating system files on the hard disk if the files are not found on diskette.
Model Information: This screen provides model number, serial number, BIOS version level number, and BIOS manufacturing date.
Date and Time: This screen allows you to change the date and time on the computer. The changes take effect immediately.
Type the date in the format shown on the screen.
Type the time in 24-hour format. For example:
12 midnight is 00:00
12 noon is 12:00
1 p.m. is 13:00
Advanced Options: This screen provides the following features that the computer supports.
Security options (power on password, diskette drive, keyboard)
- Power On Password is the option that allows you to create a power on password to restrict the use of the computer.
Each time the computer is powered on, you must enter this password before you can use the computer. A password can be
up to seven characters long (letters, numbers, or both). Once you create the password, be sure to write it down and put it in a secure place.
- Diskette Drive Access allows you to enable or disable the diskette drive access.
- Operate without Keyboard allows you the enable or disable the keyboard.
- Operate without Diskette Drive(s) allows you to enable or disable the diskette drive.
Cache options (cache size, cache state)
This option shows the amount of internal cache memory in the computer's processor. You cannot add internal cache memory to the computer.
Table 1 - 3. Rapid Resume Manager Normal Operation
|
What Happens |
Explanation |
|
Task List appears after turning on the computer. |
This is a normal feature of Rapid Resume. Use the Task List to return to an application or disable the Task List in the Rapid Resume options window. |
|
Delay before the mouse works. |
This is normal for the Standby feature of Rapid Resume. It might take a few seconds. |
|
Computer waits before turning off. |
This is normal. In some cases, it can take up to several seconds before Rapid Resume saves the data and turns off the machine. |
|
Can't start the computer from diskette if Rapid Resume is enabled. |
After you power - on the computer, press Ctrl + Alt + Del when you see the Rapid Resume screen. There might be a slight delay before the computer restarts. |
|
Computer comes on when the phone rings |
This is a normal feature of Wake Up on Ring. Disable Wake up on Ring in Rapid Resume Manager or in the Setup Utility. |
|
Computer comes on when you haven't pushed the on/off button. |
This is a normal feature of Scheduler. If you don't want this to happen, disable Scheduler in Rapid Resume Manager or Wake Up on Alarm in the Setup Utility. |
|
System unit power indicator light is blinking, but system unit is turned off. |
This is a normal feature of Wake Up on Ring enabled with the Ring indicator option selected. A fax might be waiting. |
Rapid Resume Connectors
The Rapid Resume feature connectors on the system board are one 3-pin latched connector for the power supply and one 2-pin latched connector for the power switch and cable assembly. To remove the latched connector, press in the latch using the tip of a screwdriver to release the connector.
Attention: Do not attempt repairs withthe power cord plugged into the electrical socket The power supply maintains _+5 volts dc of auxiliary power when the power switch is turned off. System damage might result if the power cord is not unplugged during repair.
Cache memory is special buffer storage that holds frequently used instructions and data, and works faster than main storage. With cache memory installed, the applications and programs run faster. You can disable cache memory to slow down the computer.
ROM shadowing
This feature provides memory boundary information.
Memory options
This feature provides standard and EDO feature information.
PCI card options
This feature allows you to enable or disable card bus mastering.
|
Search Keywords |
| |
|
Hint Category |
BIOS, Hardware Installation/Configuration | |
|
Date Created |
11-04-97 | |
|
Last Updated |
09-12-98 | |
|
Revision Date |
09-12-99 | |
|
Brand |
IBM Aptiva | |
|
Product Family |
Aptiva | |
|
Machine Type |
2162 | |
|
Model |
all | |
|
TypeModel |
| |
|
Retain Tip (if applicable) |
| |
|
Reverse Doclinks |