
|
157.104 bytes |
Service Hints & Tips |
Document ID: GSMH-3BVG4X |
|
This document is provided to IBM and our Business Partners to help sell and/or service IBM products. It is not to be distributed beyond that audience or used for any other purpose. |
TP 700,720 - FRU removals and replacements
Applicable to: World-Wide
FRU Removals and Replacements:
Follow the numerical sequence in the FRU removal sequence list and in the exploded view to remove or disconnect parts in the correct order. The letters in parentheses in the list indicate screw types. See the -- 'Screw Size Chart' -- to match the letters to the correct screw type and size before replacing each screw.
Safety Notice 8:
Before removing any FRU, power-off the computer, unplug all power cords from electrical outlets, remove the battery pack, then disconnect any intercon-necting cables.
1. Battery Pack
(Press down and pull out)
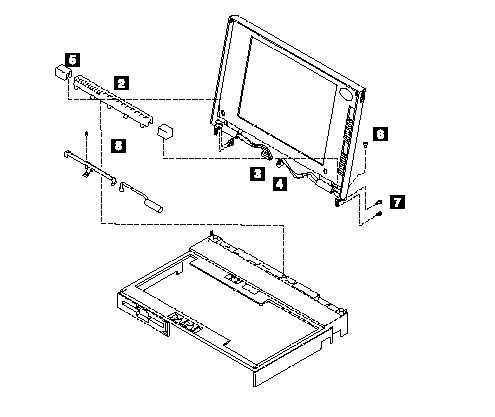
2. LED Indicator Cover
(Insert front first, then press rear down.)
3. Video Connector
4. Video Power
5. Hinge Covers
(Install with bevelled edge at front.)
6. Two Screws (C)
(One at each end)
7. Four Screws (S)
(Two at each end)
8. LED Indicator Assembly
(With connector and contact shield)
- Lift LCD Assembly from computer
- Place computer bottom-side up
9. Three Screws (S)
(On bottom cover; two at front-right, one at rear of math coprocessor access door.)
10. Two Memory Bracket Screws (S)
11. Five Screws (4-E, 1-V)
(From processor card and video card)
12. Memory Module
13. Ribbon Cable
(At rear of diskette drive)
14.Diskette Drive
(Hold the eject button pressed while installing.)
(Make sure the flexible cable gets into the holder plate opening on the IC DRAM card.)
15. Hard Disk Drive
(Have the customer backup all information before replacing the drive. Never replace the hard disk drive when the system is operating or in suspend mode. Restore drive system information using the customer's backup copy of the system programs.)
16. Three Keyboard Frame Screws (S)
17. Two Screws (T)
18. System Board
(Restore system configuration data.)
19. Five Frame Stiffener Screws (S)
20. Frame Stiffener
21. Four Keyboard Screws (S)
22. Keyboard
23. One Screw (S) and Keyboard Control Card
24. Two Screws (R) and Voltage Converter with Suspend Resume Pin
(Set the lever on the voltage converter to the middle position before installation. Be sure the suspend pin is installed correctly before installing the voltage converter.)
ThinkPad 700 Exploded View:
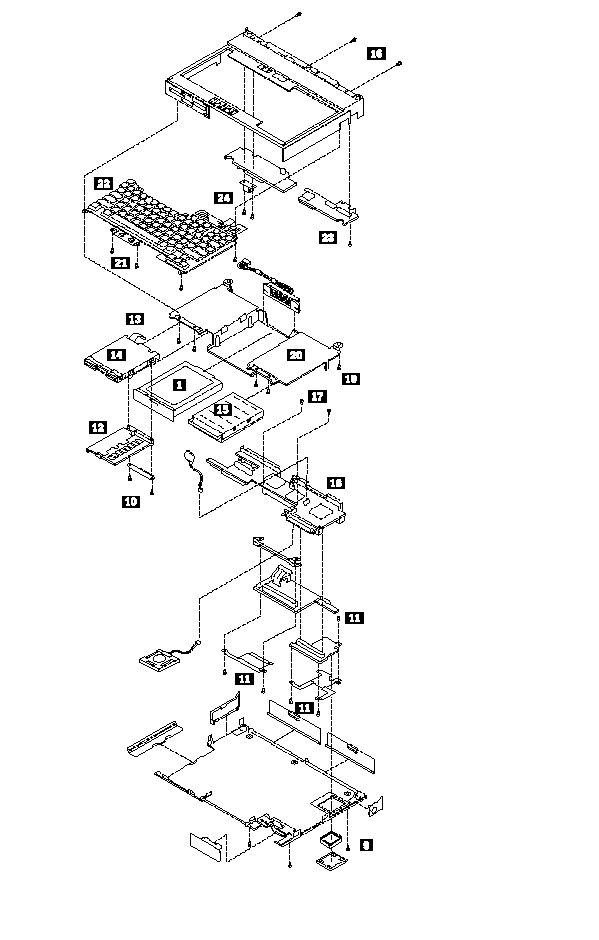
ThinkPad 700 Exploded View (continued):

ThinkPad 720, 720C Exploded View:
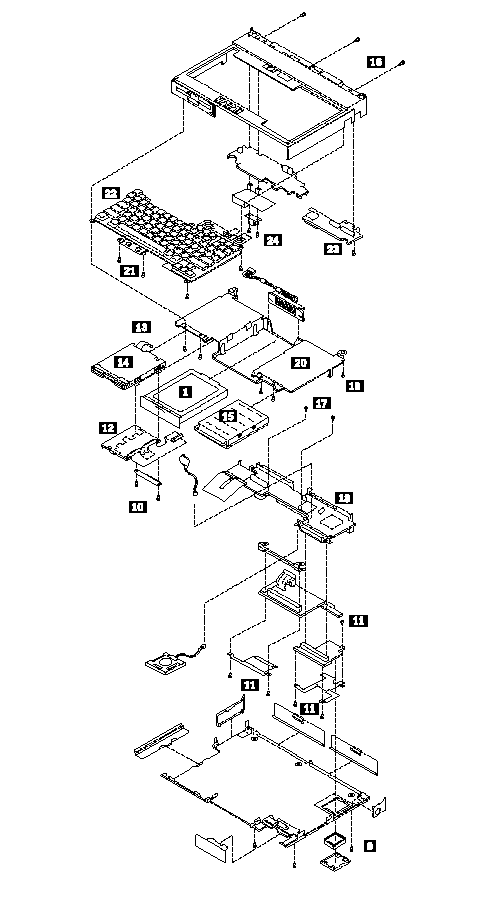
ThinkPad 720, 720C Exploded View (continued):
|
Search Keywords |
| |
|
Hint Category |
Hardware Maintenance Information | |
|
Date Created |
29-11-96 | |
|
Last Updated |
17-04-98 | |
|
Revision Date |
16-04-99 | |
|
Brand |
IBM ThinkPad | |
|
Product Family |
ThinkPad 700, ThinkPad 720 | |
|
Machine Type |
9552 | |
|
Model |
Various | |
|
TypeModel |
| |
|
Retain Tip (if applicable) |
N/A | |
|
Reverse Doclinks |