
|
41.927 bytes |
Service Hints & Tips |
Document ID: MNOK-3SWQRG |
Aptiva - 2144/2168 How to set video adapter and monitor type in Windows 3.1
Applicable to: Canada, United States
Note: This procedure expects that the monitor and adapter is set up correctly in the BIOS. The correct adapter and monitor types must be known. Consult the user's manual for the system unit or the monitor to get the correct settings. If the documentation is unavailable, consult IBM's electronic support or other technical support to get the correct adapter and files if needed. In Windows 3.1, the video adapter can be set up but the monitor can not be set up. Do not have any open files or open programs because Windows will have to be restarted for the new settings to take effect.
Win 3.1 Video Adapter Setup:
1. In Program Manager, double-click on the Main Icon Group. This should open up the Main Window.
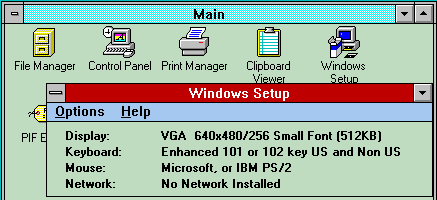
2. In the Main Window, find the Windows Setup Icon. Double-click on the Windows Setup Icon and it will open up the Windows Setup Window shown below.

Figure 1 - Windows Setup window
3. Click the Options selection on the Window and then click on Change System Settings selection. The Change System Setting Window will come up. It may come up with a dialog box which tells you that the drivers are located in a directory like C:\Windows\drivers. Write down the directory. Click the OK button to continue.
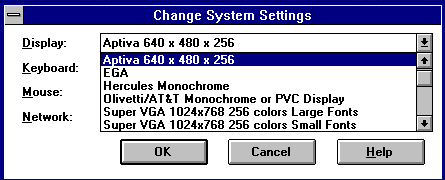
4. In the Change System Settings, there will be listings for the video, keyboard, mouse, and network and a menu at the top. Click the arrow next to the video and a drop down menu will appear in the Window. This is shown below.

Figure 2 - Change System Settings
5. Select the appropriate adapter and the appropriate settings for the adapter. On the figure above, the adapter is a generic Aptiva Type and it is set for the resolution of 640X480 at 256 colors. Many adapters will have different resolutions such as 640X480, 800X600, 1024X768, and other settings. These adapters will allow colors from 16 to 256, 64K, 16M, and other settings. The monitor must support the setting that you are choosing for the adapter. Make sure the monitor's settings are known. There is a possibility that you can damage the monitor by overrunning the monitor by over-ramping or setting it to a higher setting.
6. The system will then go to a screen asking for the location for the files. If the files are on a floppy such as new drivers, select the A:. If you are restoring the original drivers, select the directory that was shown before.
7. When the adapter is selected with the appropriate settings, the system will load the driver and then have Windows be restarted to have it take affect.
8. The system should restart and look fine.
9. If there is a problem in Windows where the settings are incorrect, the video may appear garbled. Go to a DOS session by
first pressing Alt, then F, and the X and then the Enter key. This should exit Windows and get to a DOS prompt or a menu where the DOS Command Prompt is an option.
10. Go to the Windows Directory and then at the C:\Windows directory type "setup". This will allow the settings to be changed to appropriate video settings or reset.
|
Search Keywords |
| |
|
Hint Category |
Hardware Installation/Configuration, Software Installation/Configuration, Display/Monitor, Video | |
|
Date Created |
25-03-98 | |
|
Last Updated |
09-12-98 | |
|
Revision Date |
09-12-99 | |
|
Brand |
IBM Aptiva | |
|
Product Family |
Aptiva | |
|
Machine Type |
2144, 2168 | |
|
Model |
2R5; 2R7; 2R8; M30; C30; M35; M50; 2R6; 4R7; 4R8; M40; C40; M54; M58 | |
|
TypeModel |
| |
|
Retain Tip (if applicable) |
| |
|
Reverse Doclinks |