
|
209.877 bytes |
Service Hints & Tips |
Document ID: DSHY-3SAKNP |
TP General - Setting up Infrared Communications in Windows NT 4.0 between two ThinkPads
Applicable to: World-Wide
NOTE:
This was tested using a ThinkPad 770 with Windows NT Workstation v4.0 and a ThinkPad 760ED with Windows NT Workstation v4.0 with Service Pack 3
NOTE:
The Infrared drivers for Windows NT are for use with RAS client-server connections between two ThinkPads. These drivers do not support any other form of communication between PC's. (See Techtips Document: Communicating via Infrared to other devices using Windows NT)
1.) Enable Infrared support in ThinkPad Features.
- On some ThinkPads, you will also need to make sure that the power is turned on for the IR port.
- For best results keep the default settings for the Infrared serial port.
- After making changes to ThinkPad Features you will need to shutdown your computer, and restart the system.
2.) Download the latest ThinkPad Infrared drivers, version 1.11 or later, for Windows NT
- Create the diskette from the self-extracting exe file. Click here to download the file: IRTPGWNT
3.) Run a:\install.exe from the ThinkPad Infrared driver diskette created above.
- If a previous version of Infrared drivers are installed, you will need to choose Deinstall from the menu and reboot.
- After this process is complete, run a:\install.exe again and install the Infrared drivers and then reboot again.
4.) Open Devices from the Control Panel. There will be three Infrared devices listed:
- ibmirpro
- ircomm
- irda_phy.
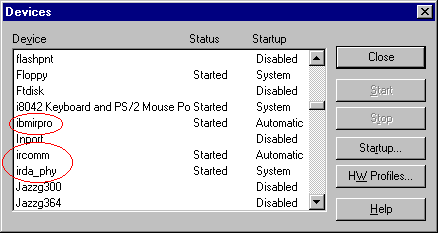
- (If these devices are not started, there may be a conflict with COM1.
- Look in Event Viewer for error messages.
- Access Event View through Start/Programs/Administrative Tools(Common)/Event Viewer
- Click on the Log menu and choose System).
- Next open Ports from the Control Panel.
- Choose COM1 and click Settings... If the Infrared has control of COM1, then the "Advanced..." button for COM1 will be unavailable.
- Change the Baud Rate to 115200.
5.) One way to test the Infrared without 3rd party applications is Hyperterm.
- Make a new connection in Hyperterm using COM1. The number to dial will grey out.
- Start Hyperterm on two systems and click on Connect. Type a message on one system.
- It appears that the NT version of Hyperterminal only transmits once the buffer is full.
- The buffer holds 80 characters.
At this point Infrared is installed and working.
The next step is to setup a Remote Access Server and dial into it.
1.) You must add the Infrared 'modem' in the Modems icon in Control Panel:
- Choose Add, check Don't detect my modem; I will select it from a list,
- Then choose: Standard Modem Types/Dial-Up Networking Serial Cable between 2 PCs.
- Select COM1, and then click on Finish.
- Now look at the Properties for the new modem, set the maximum speed to 115200.
2.) Install RAS if not already installed:
- Open Network from the Control Panel, click on the Services tab.
- If Remote Access Service does not appear on the list:
- Click Add and choose Remote Access Service.
- It will prompt you to 'Add RAS Device'.
- Choose COM1 and continue.
3.) Configuring RAS:
- Open the Remote Access Service properties, click on Configure.
- You will most likely want to change the Port Usage to: Dial out and Receive calls.
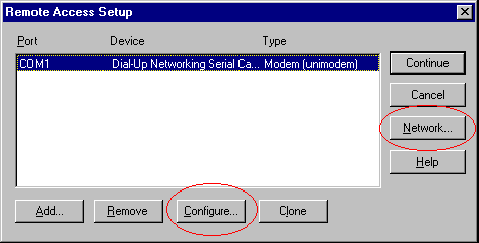
- From the Remote Access Setup window, choose Network... to select which Network Protocol(s) to use and configure. NetBEUI and IPX are the two easiest protocols to use. TCP/IP will require more in-depth knowledge to configure, but can also be used. All systems using Infrared must be setup to use the same protocol.
4.) This step is done only on the Host system (e.g. the system not making the connection).
- Go to Start/Programs/Administrative Tools(Common)/Remote Access Admin.
- If the RAS service is not started, you will be prompted to start it; do so.
- You can set the RAS service to start automatically in Services from the Control Panel.
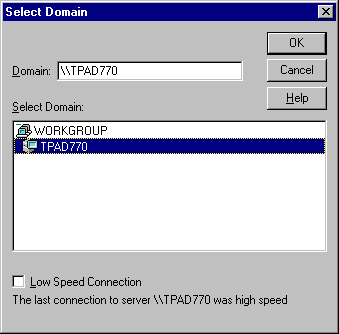
- You must grant dial in permission for each user that is to dial in:
- Click on Server, Select Domain or Server, and then choose the workgroup and/or domain which the system belongs to and then the HOST's computer machine name. ( In the picture below, the HOST computer is called TPAD770).
- Now click on the Users menu and choose Permissions. Assign permission as needed.
- If the user does not appear on the list, you will need to add the user with User Manager.
5.) To connect:
- Open Dial-Up Networking on the Guest system.
- Click on New, or More and choose Edit entry and modem properties.
- This brings up the Edit Phonebook Entry window.
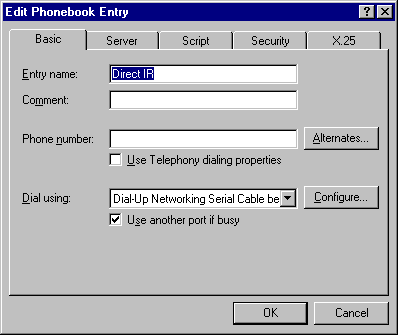
- Make sure that Dial using has the Dial-Up Networking Serial Cable between 2PCs(COM1)listed.
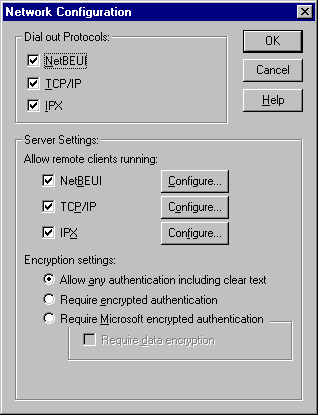
- Click on Security Tab, Authentication should be the same as the Host system. This can also be set from the Network icon in Control Panel:
- Look at the properties for RAS, click Network, and it is at the bottom under: Encryption settings.
- It is easiest to use Accept any authentication including clear text.
6.) The two systems should have the Infrared ports directed toward one another.
- The ports should not be less than six inches from each other.
- Choose Dial and you will get a message stating that you are connected.
- You may now access the other system just as you would if you had dialed in using a modem.
Notes on Windows 95...
Windows NT is the Host and Windows 95 is the Guest
- If you use Windows NT as the server, start the RAS Server service on the Windows NT computer and make sure the user who is connecting has RAS dialin permissions.
- The Windows 95 guest should connect using the Direct Cable Connect utility and should have their serial adapter configured for the same speed connection as the Windows NT computer.
Windows 95 is the Host and Windows NT is the Guest
- If you use a Windows 95 computer as the server, configure the Windows NT computer with a Phonebook entry that uses the null modem 19200 speed (or whatever speed is set on the Windows 95 computer) and dial the Windows 95 computer.
|
Search Keywords |
| |
|
Hint Category |
Infrared, Networking, Windows NT | |
|
Date Created |
05-03-98 | |
|
Last Updated |
26-01-99 | |
|
Revision Date |
26-01-2000 | |
|
Brand |
IBM ThinkPad | |
|
Product Family |
ThinkPad 365X/XD, ThinkPad 380, ThinkPad 380D, ThinkPad 380E, ThinkPad 380ED, ThinkPad 380XD, ThinkPad 380Z, ThinkPad 385D, ThinkPad 385E, ThinkPad 385ED, ThinkPad 385XD, ThinkPad 560, ThinkPad 560E, ThinkPad 560X, ThinkPad 560Z, ThinkPad 600, ThinkPad 600E, ThinkPad 755C/CS, ThinkPad 755CE/CSE, ThinkPad 755CX, ThinkPad 755CV, ThinkPad 755CD, ThinkPad 755CDV, ThinkPad 760C, ThinkPad 760E, ThinkPad 760CD, ThinkPad 760L/LD, ThinkPad 760ED, ThinkPad 760XD, ThinkPad 760EL/ELD, ThinkPad 760XL, ThinkPad 765L, ThinkPad 765D, ThinkPad 770, ThinkPad 770E/ED, ThinkPad 770X, ThinkPad 770Z | |
|
Machine Type |
2625, 2635, 2636, 2640, 2641, 2645, 2646, 9545, 9546, 9547, 9548, 9549, 9544 | |
|
Model |
Various | |
|
TypeModel |
| |
|
Retain Tip (if applicable) |
| |
|
Reverse Doclinks |