

|
1.099.609 bytes |
Service Hints & Tips |
Document ID: LWIK-3VJLL8 |
TP General - What's new for Windows 98 on ThinkPads
Applicable to: World-Wide
This document is designed to provide brief descriptions and links to Windows 98 Upgrade sites and documents for ThinkPad systems. From general Windows 98 Upgrade Program information to detailed Installation guides, this index will help you maximize the benefits of this next generation in the Microsoft Windows operating system family.
What's New in Windows 98 for ThinkPad
Once you have upgraded to Windows 98, you will notice a number of changes in the way that your ThinkPad operates with Microsoft Windows 98. Some of these are general Windows 98 changes and some are specific to ThinkPads. This document is to highlight the changes that are specific to ThinkPad users who have upgraded from Windows 95 to Windows 98.
If you are interested in Windows 98 general information, or you are upgrading from a different operating system other than Windows 95, be sure to take the Welcome to Windows tutorial provided by Microsoft. To start the Windows 98 tutorial, click Start, and then select Programs, Accessories, System Tools, Welcome to Windows.
Visit Microsoft's Windows 98 home page for a list of features and functions of this new operating system.
What's Included in This Document
The following sections are about ThinkPad functions with Windows 98:
1. PC Card Configuration - Because Windows 98 offers improved support for a variety of PC Cards, you no longer need System Soft CardWorks software and drivers originally shipped with your ThinkPad. Read this section for more details.
2. General Hardware Configuration - The new ThinkPad Configuration utility makes it easier to configure built-in hardware and power management. On most systems, you will notice better integration with Windows and a new quick menu for hardware configuration. Read this section for more details.
3. Infrared Function and Configuration - IBM ThinkPads preloaded with Puma Intellisync 97 provide Windows 98 support for LAN connectivity and file transfer via infrared, parallel and serial cable. IBM ThinkPads that have Puma TranXit preloaded are not supported on Windows 98. The Windows 98 operating system offers support for LAN connectivity and infrared file transfer . Read this section if you currently use the infrared port on your ThinkPad.
4. Power Management Function and Configuration - Windows 98 provides new ways to manage power on your ThinkPad so you can extend the life of the battery. Read this section if you use power management on your ThinkPad.
5. FAT 32 Support - Windows 98 promotes a new FAT32 file system that increases your hard disk space and also speeds your hard disk performance. Read this section if you plan to convert you hard disks to the new FAT32 file system.
6. Other Considerations - Before you upgrade, you will want to know any issues associated with using Windows 98 on your ThinkPad. Be sure to read this section.
PC-Card Configuration
Your ThinkPad came preloaded with special PC Card support software. During the installation of Windows 98 and the ThinkPad Windows 98 Companion, you should have uninstalled the System Soft CardWizard or Card Director software that was provided with your ThinkPad when you purchased it. Special PC Card software is no longer necessary in Windows 98 because of improved Windows 98 PCMCIA Card Services support such as CardBus support.
Now when you insert a new PC Card, the Windows 98 plug-and-play feature should automatically configure the new PC Card. The Add Hardware Wizard automatically appears when you insert a PC Card.
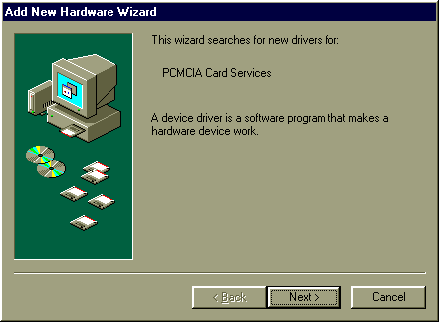
Figure 1: Window PCMCIA Card Services Wizard
Follow the instructions on the screen to install the new PC Card. In some cases, will need to provide the PC Card manufacturer's diskette(s) in order to install the proper software. However, unless manufacturer's diskette contains driver software specifically for Windows 98, you should either (1) use the driver that Windows 98 plug-and-play recommends, or (2) visit the PC Card manufacture's Web site for more information and updated driver software.
Overall, this new PC Card support is simpler and more usable because you only have one standard way to install and configure PC Cards - the Windows 98 plug-and-play PC Card Services support software.
General Hardware Configuration
Your ThinkPad came preloaded with a hardware configuration utility called ThinkPad Features or ThinkPad Configuration. During the installation of Windows 98 and the ThinkPad Windows 98 Companion, you should have uninstalled the utility that originally came with your system, and then installed a new ThinkPad Configuration Utility for Windows 9x. On most ThinkPads, you will notice many usability improvements to the ThinkPad Configuration utility.
The Quick Configuration Menu
The new Quick Configuration Menu is always present on you Windows Task Bar. Simply click the ThinkPad icon on the Task Bar System Tray, and you are one click away from all of your ThinkPad's configuration, such as LCD settings, Power Management, and Device Configuration.
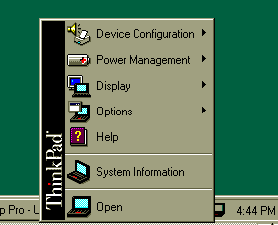
Figure 2: The new ThinkPad Quick Configuration menu
Improved GUI Design
When you click Open... from the Quick Configuration menu, you will see a new and improved design for the familiar ThinkPad favorite to control your hardware. Check out the following features:
o Improved intuitive icons and Windows 9x consistency
o Flyover help means no more guessing which button to click
o Windows Control Panel integration means there is only one place to change a setting
o One-click access to Device Manager makes advanced device configuration faster and easier
Infrared Function and Configuration
Your ThinkPad came preloaded with special Infrared file transfer support software- Puma Tranxit or Intellisync. If your ThinkPad was preloaded with Puma Intellisync 97 (ThinkPad 770E and ThinkPad 600 models only), you will still have Windows 98 support for LAN connectivity and file transfer via infrared, parallel and serial cable. If you have Puma Tranxit you should have uninstalled it during the installation of Windows 98 and the ThinkPad Windows 98 Companion. As a special offer to IBM users, you can upgrade for only $34.95 to Puma's Intellisync for Notebooks. Click on the hyperlink to find out more: http://www.pumatech.com/tranxitup.tpl If you choose not to upgrade, you can use the Windows 98 infrared support. You can use your infrared port as a virtual direct cable connection to access all of the resources of another Windows 98 computer, including hard disk drive access and LAN connectivity. You will notice a difference in the way that you use the infrared port to transfer files and access another systems resources when you use the Windows 98 infrared support. Notice, ThinkPads using the Windows 98 IR will not be able to communicate with ThinkPads using Puma IR.
Enabling the Infrared Monitor function
1. Click Start, Settings and Control Panel.
2. Double-click the Infrared icon.

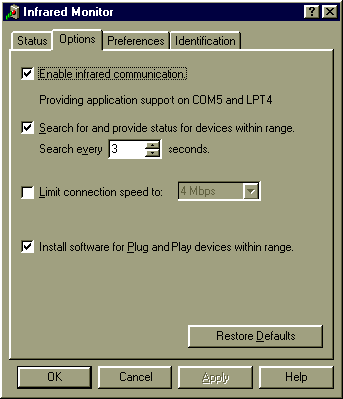
3. Click the Options tab and make sure that the Enable infrared communication box is checked. Be sure to take note of Providing application support... (for example in the figure below, application support is provided on COM5 and LPT4). You will need to know these settings when using other infrared (IrDA-compliant) applications.
4. Click OK.
To transfer Files to another computer using Windows 98 Infrared Transfer
Windows 98 integrates infrared File Transfer function into its file management system so that you no longer need any special infrared file transfer software. To transfer or receive a file with another computer using Windows 98 Infrared Transfer:
1. From the Windows 98 desktop, double-click My Computer.
2. Double-click the Infrared Recipient icon. The Infrared Transfer panel appears.

3. Move your computer so that the infrared port on your computer is facing the infrared port on the other computer. You should see the icon for the other computer appear on the Infrared Transfer panel.
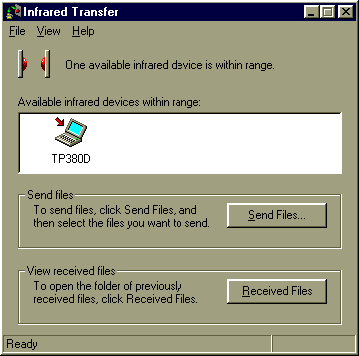
4. Click Send Files to open a file browser and find the file(s) that you want to send.
5. Select the files that you want to send.
6. Click Open. The file transfer progress indicator will appear to show you that the files are being transferred.
7. On the other computer, click Received Files once the transfer is completed.
Using the Infrared Port as a Virtual Direct Cable Connection
1. Click Start, Programs, Accessories, Communications, Direct Cable Connection.
2. Follow the instructions on the screen. Be sure to use the online help of you have questions.
3. When asked, choose the COM setting for your infrared port (for example COM5).
4. Setup the same Direct Cable Connection on the other computer running Windows 98 that you want to access.
Power Management Function and Configuration
You will notice two major changes to your power management system when you upgrade to Windows 98. First, all of the ThinkPad-specific power management settings are now integrated directly into Windows 98 Power Management Properties control panel. In addition, Windows 98 controls more power management settings so some of the terminology have changed.
To help you better distinguish new Windows 98 power management settings from familiar ThinkPad power management settings, we have added ThinkPad icons to certain tabs of the Power Management Properties control panel (however, some of the settings that you have used as ThinkPad features might actually be controlled by Windows 98 now).
To open Power Management Properties control panel:
1. Click the ThinkPad icon on the right side of the Task Bar. The Quick Configuration menu appears.
2. Select Power Management, Settings.
or
1. Click Start, and then select Settings, Control Panel
2. Double-click the Power Management icon
3. Select the appropriate tab for the setting that you want, make your changes, and then click Apply (keeps panel open for more changes) or click OK (makes change and closes panel)
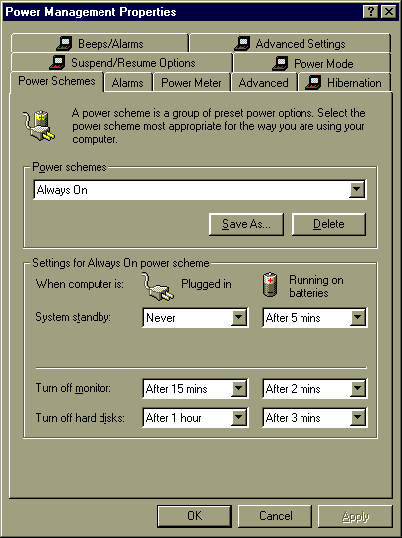
Figure 4: The Power Management Properties control panel: Power Schemes tab
Tip: Whenever you see a setting that you do not understand, be sure to use the What's This feature of the control panel:
1. Click the [?] button in the upper right corner. Your cursor changes to a question mark.
2. Click the setting (the text label, list box, drop-down list, etc.) that you want more information about.
Function and Terminology Changes in Windows 98 Power Management
If you use power management frequently on your ThinkPad, you will notice some changes to terminology as well as the way you manage your power management. Here is a summary of terminology changes:
|
Function |
Old Term |
Windows 98 Term |
Other Information |
|
Turn off your LCD panel by pressing the Fn and F3 keys at the same time |
Standby |
There is no longer a name for this function. However the function still exists. |
Also called "Screen blanking" and "Turn off monitor." |
|
Enter Suspend (power saving) mode by pressing ,the Fn and F4 keys at the same time closing the lid, or by setting a Timer. |
Suspend |
Standby |
To set a timer, click the Power Schemes tab and set the Standby timer. |
|
Disable screen blanking timer when giving a presentation |
Presentation Mode |
Always on and Turn Monitor Off timer. |
There is no button for this, but you can select Always on from the Power Schemes tab. You should also manually set Turn Monitor Off to Never. |
|
You want to make sure that your ThinkPad safely suspends or hibernates when your battery power becomes critically low. |
Hibernate when battery becomes low |
Low Battery Alarm and Critical Battery Alarm. |
Both the old function (Hibernate when battery becomes low) and the new functions (Low Battery Alarm and Critical Battery Alarm) can be used to achieve this. If you choose to enable Hibernation, we recommend that you use the Hibernate when battery becomes low function which has a threshold of 1%. You can also use the Low Battery Alarm and Critical Battery Alarm settings as added warnings if you like. |
|
Set Resume Timer for your system to always resume from suspend mode at a particular time of day. |
RTC Resume or Resume Timer |
Scheduled Tasks |
Under previous versions of Windows, you could set a timer to wake up your system at a particular time. Now, you have to schedule a task (such as a maintenance task) to wake up your computer at a specified time. Click Start, Programs, Accessories, System Tools, Scheduled Tasks. Pick an existing scheduled task, or Add a Scheduled Task. Set the property of the scheduled task that you choose to wake up your computer. See the Scheduled Tasks online help for more information. |
|
Enable your ThinkPad to resume when you have an incoming call on your modem. |
RI Resume |
This setting no longer exists because the function is always enabled. |
In Windows 98, your computer is always set to wake up from Standby (Suspend) mode when you receive an incoming call on your modem. |
Changes to Common Power Management Settings
Here are some examples of power management tasks that have changed, and how to use Power Management Properties in Windows 98. Be sure to refer to Figure 4 and Figure 5 to better understand these instructions.
You want to maximize your battery life and are not worried about system performance (for example you are just using a word processor and you are on a long airplane flight)
1. From the Power Schemes tab, set your Standby, monitor off, and hard disk off timers to fit your situation. You might want to save these settings as a new custom Power Scheme to use again later.
2. From the Power Mode tab, set your power mode to Automatic or Custom for the Battery Power Source. If you choose Custom, then you can set your Processor speed to ˘ Speed or … Speed to save more power. You can also quickly adjust power mode by pressing Fn+F11.
You want to maximize system performance when you are at your desk and connected to a power supply .
1. From the Power Schemes tab, select the Always On power scheme. Make any other adjustments to the timers on this Tab. You might want to save these settings as a new custom Power Scheme to use again later.
2. From the Power Mode tab, set your power mode to High Performance for the AC Power Source. You can also quickly adjust power mode by pressing Fn+F11.
You want to make sure your LCD screen does not shut off or ôblankö automatically when you are giving a presentation or demo.
1. Use the Power Schemes tab to set your System standby and Turn off monitor timers to Never for the power source that you will be using (Plugged in and/or Running on batteries). You might want to Save As a new power scheme after you make adjustments so that you can quickly reset to this presentation mode again later.
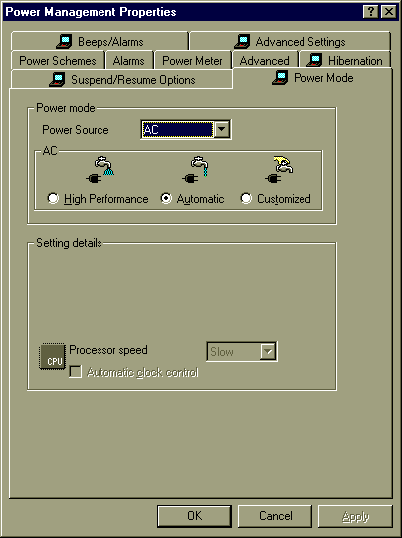
Figure 5: The Power Management Properties control panel: Power Mode tab
APM versus ACPI Power Management (ThinkPad 600, 770E, and 770ED users only)
Your ThinkPad 600, 770E or 770ED computer has been designed to take advantage of a new Power Management industry standard known as Advanced Configuration Power Interface, or ACPI. Windows 98 is the first operating system to take advantage of this new ACPI standard, but Windows 98 also supports the older APM power management. The instructions on the ThinkPad Windows 98 Companion CD-ROM and the information in this document assumes that you will continue to use Advanced Power Management (APM) instead of ACPI.
At the time that the Companion CD-ROM and this document were created, there were significant issues with Windows 98 support of ACPI. Ultimately ACPI will deliver superior performance and improved usability, but for now APM is proven and more stable.
IBM and Microsoft are working closely to deliver superior ACPI performance and stability. By the time you use the Companion CD-ROM and read this document, there will be new information and software posted on our Web site at http://www.pc.ibm.com/qtechinfo/THID-3W8PMT.html. Please review this latest information before making a decision to choose ACPI as your power management standard.
FAT32 Support
FAT32 is a new file system available in Windows 98 that optimizes your hard drive to increase disk space and speed up software applications. Your ThinkPad was originally shipped with the C:\ drive formatted as FAT16, not FAT32. After you upgrade to Windows 98, you can use the Driver Converter utility to convert you hard disk drive(s) to FAT32. Your ThinkPad's hard disk drive supports FAT32, but some of your software applications (particularly utility programs) might not support FAT32.
Important: Please verify that your favorite software applications and utilities are compatible with FAT32 before you convert your hard disk because you cannot revert to back to a FAT16 file format.
To convert your hard disks to FAT32
1. Click Start, and then select Programs, Accessories, System Tools, and Driver Converter.
2. Follow the instructions on the screen.
Known issues with FAT32 on ThinkPad Systems
At the time this document was written, the Hibernation function is not supported if you convert all of your hard disk drives (or all disk drive partitions) to FAT32. Please check our Web site for the latest information on this issue as we plan to support Hibernation on FAT32 drives in the future.
Other Considerations
Before you upgrade, you will want to know any issues associated with using Windows 98 on your ThinkPad.
Please click here. to view a list of overall considerations for running Windows 98 before continuing.
ThinkPad specific considerations for upgrading your ThinkPad to Windows 98
ThinkPad 310,315
ThinkPad 365X/XD
ThinkPad 380, 385
ThinkPad 560
ThinkPad 600
ThinkPad 760, 765
ThinkPad 770
|
Search Keywords |
| |
|
Document Category |
Windows 98 | |
|
Date Created |
17-06-98 | |
|
Last Updated |
12-04-99 | |
|
Revision Date |
19-01-2000 | |
|
Brand |
IBM ThinkPad | |
|
Product Family |
ThinkPad 310, ThinkPad 315, ThinkPad 365X/XD, ThinkPad 380, ThinkPad 380D, ThinkPad 380E, ThinkPad 380ED, ThinkPad 380XD, ThinkPad 385D, ThinkPad 385E, ThinkPad 385ED, ThinkPad 385XD, ThinkPad 560, ThinkPad 560E, ThinkPad 560X, ThinkPad 600, ThinkPad 760C, ThinkPad 760E, ThinkPad 760CD, ThinkPad 760L/LD, ThinkPad 760ED, ThinkPad 760XD, ThinkPad 760EL/ELD, ThinkPad 760XL, ThinkPad 765L, ThinkPad 765D, ThinkPad 770, ThinkPad 770E/ED | |
|
Machine Type |
2600, 2625, 2635, 2640, 2645, 2646, 9546, 9547, 9548, 9549 | |
|
Model |
Various | |
|
TypeModel |
| |
|
Retain Tip (if applicable) |
| |
|
Reverse Doclinks |